In the previous tutorial, we explored how to define the basic timbre of an oscillator. Although Oberon is an additive synthesizer at its core, it has a number of features that resemble the classic subtractive architecture that is the basis for most of the synthesizers from the very start. Most importantly, it also has filters.
Filters are great to quickly sculpt your sound by removing or boosting large portions of your spectrum. Classically, a synthesizer filter consists of a low pass profile which attenuates frequencies above a certain frequency value. Modern synthesizers can switch to alternate profiles like high pass or band pass.
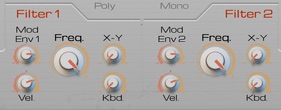
Oberon offers two filters which are identical in nature. As we will see, each of them can alter the sound of both oscillators. But lets see how things are done in Oberon.
Frequency
This should be very familiar to you as this controls the cutoff frequency of the filter. By default, both filters have a low pass profile. You can verify this by pressing a key and playing around with Filter 1’s frequency parameter. In the following example, we’ve set the frequency value to a low value of around 200Hz. If you proceeded from tutorial 1, you should hear something like this, much less brighter than the sound we had at the end of tutorial 1.
Envelope modulation
If you listen carefully, you should notice that the attack of the sound is much brighter than the sustain part. Something is amiss with the filter frequency. There is no bug or magic there but just the effect of modulation envelope 1 modifying the filter frequency over time. Both filters 1 & 2 have their frequency parameter modulated by respectively modulation envelope 1 & 2. The amount of modulation is controlled through respectively the Mod Env 1 & Mod Env 2 knobs to the left of the filter frequency knobs. As you can see, by default there is a fair amount of modulation going on. Try setting it to 0 (middle position) and you should hear a sound that is fairly dull and static:
The modulation depth of the envelope can furthermore be modified by the velocity. This is great for dynamic bass sounds for example and is controlled by the Vel knob just underneath the modulation envelope knobs. If you set the velocity knob to full value and the modulation envelope depth back to the original value of 65, a low velocity note will have almost no envelope modulation, while high velocity notes will have the full modulation depth of 65. This is an example of what it should sound like playing notes with gradually more velocity:
Editing the envelope
To edit the modulation envelope 1, which is the one modifying the filter 1 frequency, click on the Mod 1 button of the Envelopes display section just underneath the top central display. You should see this:
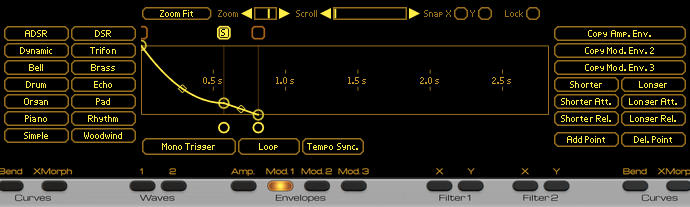 Just like the wave curve display, to the left are a list of envelope templates, crazy or classic, to let you quickly set your envelopes. But of course, you can also modify them by moving the points around and adding / removing them. You should notice something new, though.
First of all, above the curve frame is a small “S” label. This identifies the sustain point. If you wish to modify this, just click on one of the rounded boxes above each point. In Oberon, all points before the sustain point are considered part of the attack while all points after are considered part of the release.
Lets try to create a more “picked bass” sound by shortening the envelope attack. You can do this by dragging the sustain point to the left or by using the quick edit button to the right of the curve display labelled “Shorter Att.”. This will scale down in time all points before the sustain point. Here’s our modulation envelope after shortening the attack:
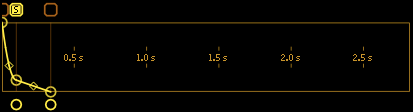
To have even more dynamic velocity in our sound we’ve increased the filter 1 modulation envelope 1 depth to the full value and brightened it up a little by increasing the filter frequency to around 560Hz. With our new envelope, here’s our sound with increasing velocity:
Filter Curves
Now that we’ve played around with the cutoff frequency, the most acute readers among you should wonder if Oberon has any resonance setting. The answer is: yes, and even more. To the top right of the frequency knob you should see a small knob labelled “X-Y”. Try increasing it to the full value and listen to the sound:
Sure enough, we recognize the typical funky squeal sound characteristic of a high resonance value. So why call this knob “X-Y”?
In Oberon, there is no such thing as “resonance”. The synthesizer uses a more broader scheme based on two filter profiles for each filter. Each filter has an X profile and a Y profile. By default, filter 1, for instance, has a low pass profile assigned to the X profile and a resonant low pass profile assigned to the Y profile. Changing the X-Y knob towards the right (towards Y) gradually morphs the final filter between this flat low pass profile to a squeaky resonant low pass profile.
Now the interesting part is that each X and Y profile can be edited for both filters the same way as wave forms or envelopes can. This implies that you can very well decide that the X profile is a low pass profile and the Y profile a high pass profile. Lets see this in action by clicking on the X button of the Filter 1 display. Here’s how your display should look like:
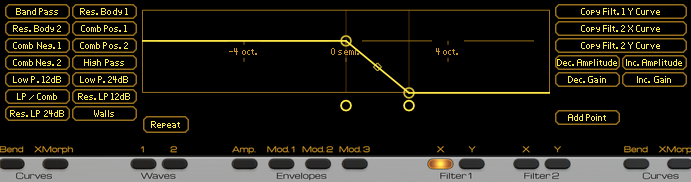 All this should now be familiar as you recognize a list of curve templates to the left, with the classic low pass, band pass, high pass profiles and some other more esoteric ones. Sure enough, the X filter curve which defines the X profile looks definitely like a low pass filter. The low end is at 0dB gain. Every point above it creates a gain (like a resonance), while every point underneath creates a cut (like a notch). In fact, if you are accustomed to graphical equalizers, you should feel right at home.
At the center of the display, labelled “0 semi” is the cutoff frequency. Everything to the right is above the cutoff frequency and everything to the left are lower frequencies. The labels “-4 oct.” and “4 oct.” indicate that at this horizontal position, the frequency is 4 octaves lower or higher, respectively than the cutoff frequency.
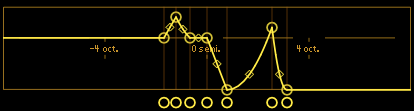
Lets switch to the Y curve by clicking on the neighboring Y button:

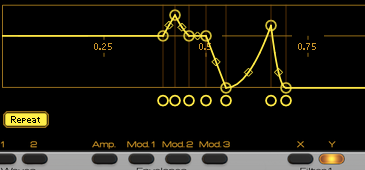
The peak is our resonance and as we can see, it is perfectly centered on our cutoff frequency. This is not an obligation and we can easily change this with the usual point dragging and “Add / Remove point” features. Lets try something complicated with two resonance-like peaks like this:
 With the filter 1 X-Y knob fully turned to the right and with a slight global volume attenuation to prevent clipping, this is what it sounds like:
Now with the X-Y knob on filter 1 we can go from a normal low pass filter (approximately sounding like a 24 dB/octave filter) to a low pass filter with character. If you wish you can link the modulation wheel to the filter 1 X-Y parameter with the modulation matrix.
Repeat
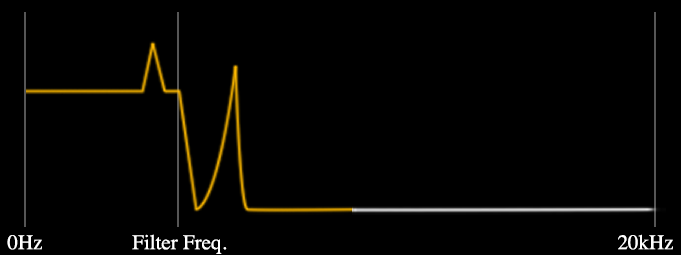
There is another little thing we can do with filters and that is to repeat the filter response. You may have noticed this weird “Repeat” button under the filter curve to the left. Pressing this will change how the curve is applied as a filter response. When activated, the response is repeated across the frequency spectrum with a period defined by the filter frequency. For instance, if we activate repeat on our current filter setting with a filter frequency of 550 Hz, the filter curve controls the gain and attenuation of the spectrum for a 550 Hz wide band that is repeated every 550 Hz.

Again, using the spectrum EQ window will makes things clearer but here is a diagram showing the differences with non repeated filter curves first then repeated filter curves.
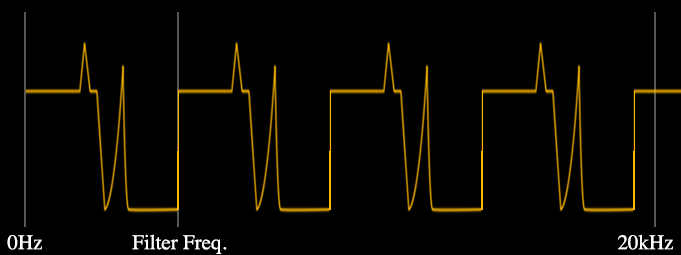
Repetitive filters like this are not uncommon in classic subtractive synthesis. Comb filters behave exactly the same way with repetitive peaks or repetitive notches.
Lets listen to our patch with repeat activated:
Filter Modes
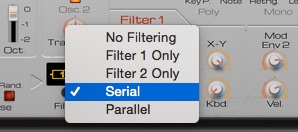 To finish off this tutorial on filters, we will take a look on how both filters are applied on oscillators.
By default filter 1 & 2 are applied in sequence / serial. Pressing the button over the “Filtering” label between the oscillator and filter sections reveals a popup menu with all the available filtering modes for each oscillator.
For performance reasons, it is sometimes interesting to switch to no-filtering or to a single filter only if the other has no effect. Just to be tidy, we will switch to Filter 1 Only. Hopefully the sound should remain the same!