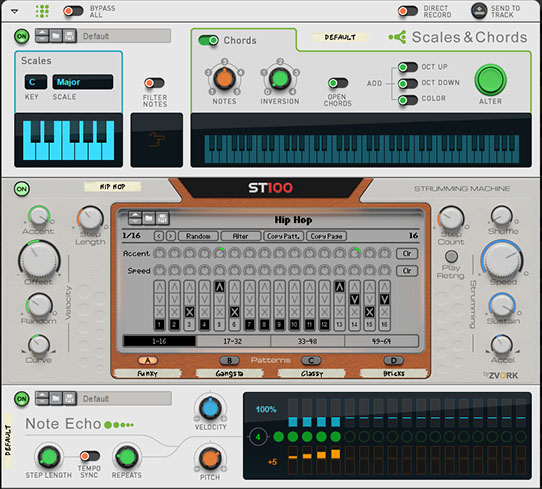
We’re happy to announce the release and immediate availability of our first player rack extension for Reason, the ST100 Strumming Machine. Yes, starting with Reason version 10.1, as the name of the rack extension implies, you will be able to play strums on any instrument in your rack. Check out the product page for more information!
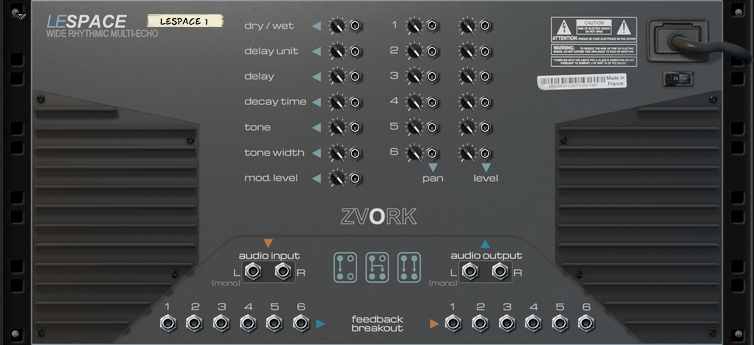
Zvork participates in the Black Friday sales at the Propellerhead Software Shop by offering a 60% discount on its rhythmic spatialised multi-delay Rack Extension, LeSpace:
6 independent delay lines.
feedback matrix.
echo sequencing for each line.
Originally priced at 39$ / €, the plugin is offered at 15 $ / € until november 28. The plugin is exclusively available for Propellerhead Software’s Reason DAW and on both Windows and MacOS.
After exploring the front panel of the Oberon Synthesizer, now is the time to have a look at the back panel. There lies a feature that can enable some creative sound construction and some interesting combinations between Oberon and other rack devices.
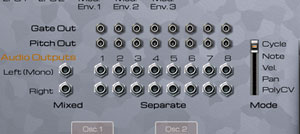
Apart from the classic CV inputs and outputs for modulation and CV note control, you should notice right at the center a great number of audio outputs.
Audio Outputs
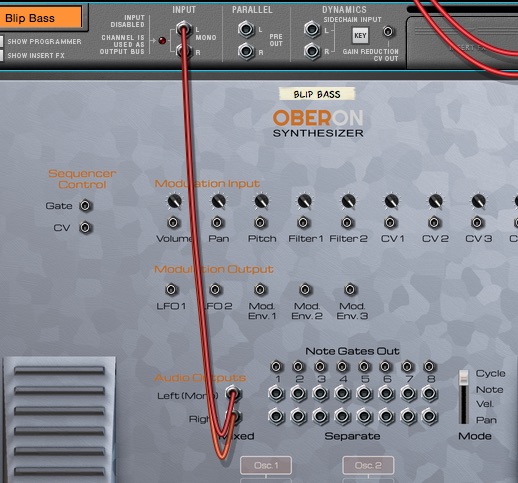
Lets start with a new song. Create an Oberon device and select the “Blip Bass” patch in the “- By Category / Bass” folder of the Oberon Synthesizer patches. Now switch to the back panel with the TAB key. When an instrument is created in Reason, the device’s main output is automatically connected to the device’s channel mix audio input. As you can notice, Oberon’s “Mixed” audio output is connected. This is the stereo output with all the voices mixed into one single stereo stream, which is what we need 99% of the time.
To the right of this mixed stereo output lie 8 stereo audio output pairs numbered from 1 to 8. Lets disconnect the mixed audio output from the canal mix and connect it back to the stereo separate output 1.
If you play the patch, you can notice that there is absolutely no difference in output. You can try switching to output 1, 2, 3 or any other of the 8 separate outputs, it will make no difference. So are those separate outputs only replicates of the main mixed output?
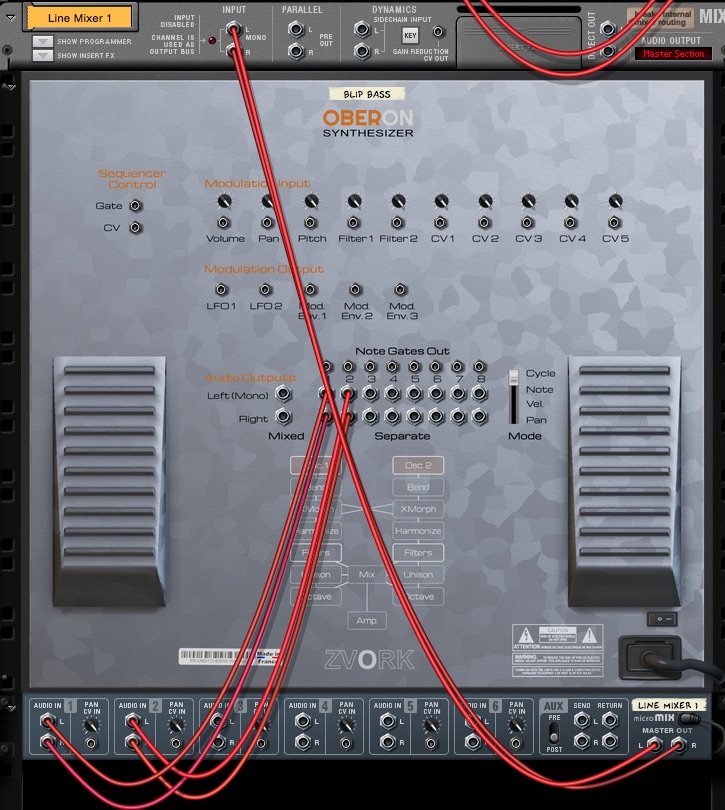
No, of course. Things get more interesting once you use more than one. Lets create a Line Mixer 6:2 device and delete the Channel Mix device that was automatically created with it. We won’t need it as we will use the one created with Oberon. Now connect Oberon’s separate output 1 to the first channel of the mixer and separate output 2 to the second channel. Now connect the mixer output to the Oberon channel mix input:
Again, if you play the patch, you shouldn’t hear a difference. But switch back to the front panel and look at the VU meters of the channel mixer’s first two channels. Notice how each time you press a different note it is a different channel that receives audio? In fact, at each key press, even if it is the same note, it alternates from one channel to another.
This gets even more apparent if you connect a third separate output to the channel mixer. For instance, connect separate output 5 to the third channel mixer input. This time the output of each voice cycles through all three connected outputs.
Output Modes
This behavior of “cycling” through the different connected separate outputs is the default output mode, but this can be changed. To the right of all the separate stereo output pairs is a vertical fader switch with four different states. By default, it is on “Cycle” which exactly what we are experiencing. Switch that to “Note” and play. Be generous and use the entire keyboard span.
This time, the voices played are sent to the outputs depending on the note pressed. Low notes are sent to output 1, mid notes to output 2 and high notes to output 5.
Now switch to output mode “Vel.”, for velocity and play. As the term coins, this time the voices are sent to the outputs based on their key velocity. Low velocity voices are sent to output 1, mid velocity ones are sent to output 2 and high velocity ones are sent to output 5.
As you can imagine (and you can try it out for yourself), using output mode “Pan” distributes the voices to the connected separate outputs based on the stereo pan value of the notes.
Lets switch back to “Cycle” mode and see what we can do with all this.
Varying effects
With all these separate outputs we can apply effects to the Oberon Synthesizer differently for each note. Lets connect a fourth separate output to the channel mixer, for instance separate output 8. As you should understand by now, the exact separate output number doesn’t really matter as Oberon only considers the connected outputs. In between each separate Oberon audio outputs and the mixer channels, we will insert an effect device, different for each output.
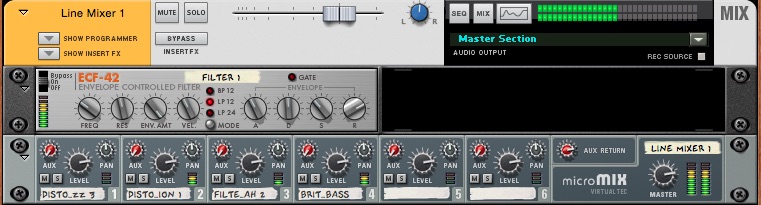
We used the Softube Amp and Bass Amp device patches for that and created four instances with these patches:
Distortion – Amp Fuzz 3
Distortion – Amp Distortion 1
Filter – Amp Wah 2
Brit Sound Bass
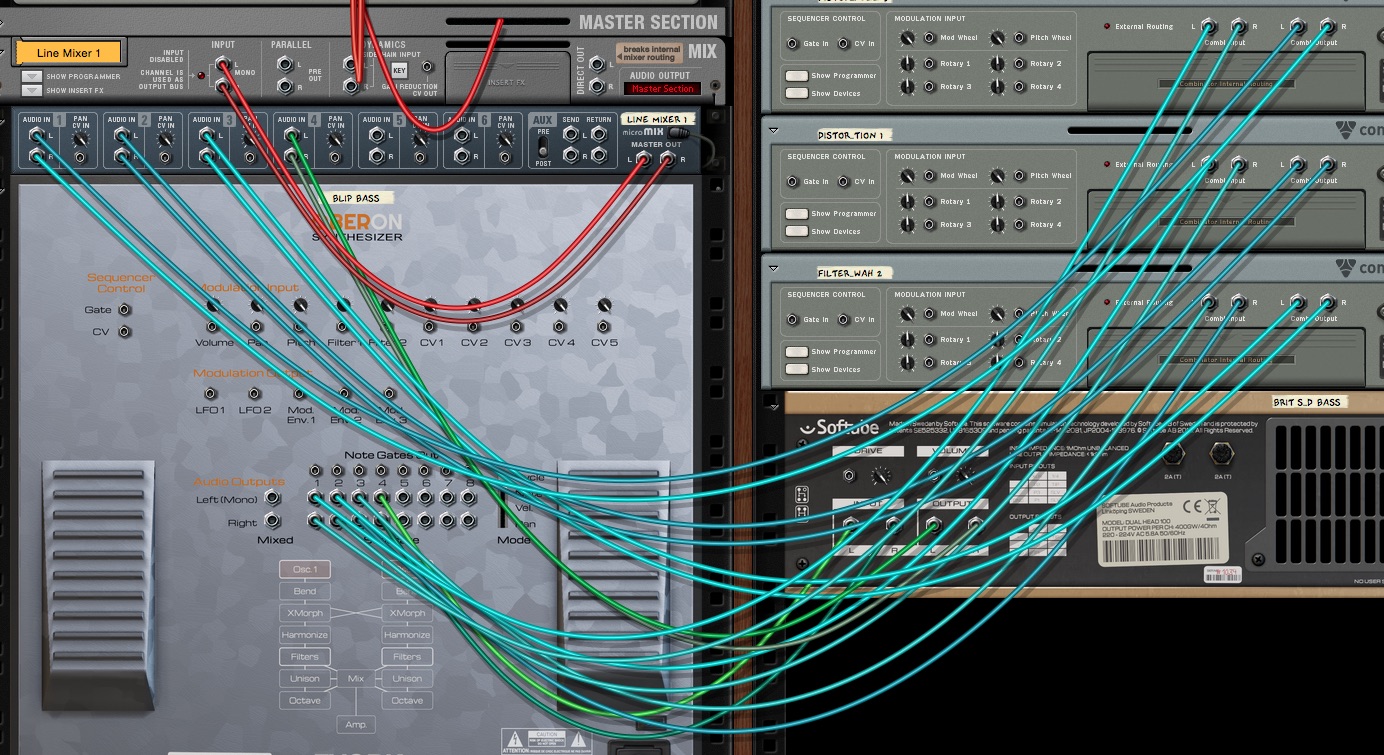
Now connect separate output 1 to the first effect input, separate output 2 to the second effect, separate output 5 to the third effect and separate output 8 to the fourth effect. Finally connect the output of the first effect to the mixer channel 1 input and repeat the process for the remaining three effects. You should have something like this (mind the spaghetti):
To test if this is working, press a single key multiple times. You should here the Blip Bass patch being played in cycle through all four effects for something that sounds like this on a C2:
To put this into context, we’ve created a Matrix sequence that we have connected to Oberon.
Here is the raw loop without effects followed by the same loop with the cycling effects:
And here’s that same loop with effects but this time with the separate output mode set on “Vel.”:
Separate Note Gates
There is another feature we can use to spice up our loop. Oberon has separate audio outputs but it can also output a CV gate signal each time a note is sent to each connected separate output. This of course reacts to the current separate output mode.
We can use this to our effect by applying a time varying filter that will trigger each time a note is sent to one of our separate outputs. For instance we can decide that each time a voice is sent to separate output 2, an envelope controlled filter ECF-42 is triggered on our Mixer output.
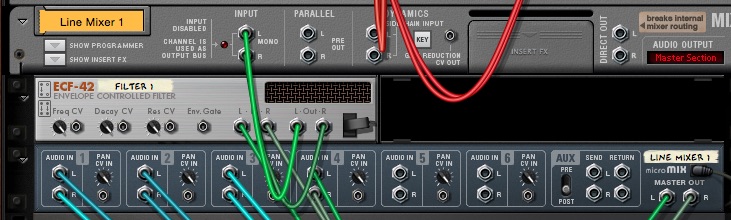
To do this create an ECF-42 device and connect its input to the output of the Mixer device, then the output of the ECF-42 to the Oberon Channel Mix input, like this:
Then, connect the separate output 2 gate signal (the socket is just above the audio stereo pair) to the ECF-42 “Env. Gate” input socket. The filter should trigger every four notes played.
Here we’ve configured our ECF-42 with very dynamic settings and a slow attack:And this what our loop sounds like in “Cycle” mode, followed by the same loop in “Vel.” mode:
An interesting feature of the Oberon Synthesizer is the ability to morph between two spectrums. With this you can create interesting crossfades between two different sounds, for example between an inharmonic one and an harmonic one. Sometimes the result is somewhat unpredictable but it is a definitely a place for experimentation. Lets take a closer look.
X-Morph
As said in the introduction, Oberon’s cross morph feature works with spectrums. It is not trying to morph between waveforms but between the corresponding “instantaneous” spectrums of oscillator 1 or oscillator 2. Before going into too much explanations, lets dive in and listen to what this does.
Start by creating an Oberon device then reset it to a default configuration. With no surprise you should hear a classic sawtooth when playing it. Now play around with oscillator 1’s x-morph knob. Hopefuly, you should very quickly come to the conclusion that nothing changes. How frustrating.
This is of course is very logical. Oscillator 1’s x-morph function lets you morph between its output spectrum and the output spectrum of oscillator 2. This works even if oscillator 2 is disabled, by the way. When Oberon is reset to its default configuration, the output spectrum of both oscillators are totally identical. They both use the same wave, with the same wave sequence position, are pitched identically and have their bend and partial clip modifiers muted (for more information on these two, check out the dedicated tutorial).
To hear something, we need to make oscillator 2 different. Lets change its wave by putting the wave position of oscillator 2 to 50%, which by default should be a triangle wave. Now, play while increasing oscillator 1’s x-morph knob:
As expected, the sound gradually fades to a triangle wave. Things aren’t quite exciting yet as this could already be done with the Waves 1 & 2, although with not exactly the same result. Now lets use a “metal” wave on oscillator 2 and play again while increasing the morph position:
As you can hear, the sound changes to metal smoothly and in a way that is different from a simple crossfade.
Metal Attack
With that in mind, lets create a patch that has a metallic attack and then fades to a triangle wave. For a reason that will become clearer near the end of the tutorial (and is purely related to the final patch we have in mind), lets use the metallic wave on oscillator 1 and the triangle wave on oscillator 2. Again, the triangle wave is by default in Wave 1 with start position set to 50%.
If you set oscillator 1’s x-morph position to 100%, played on a C2, you should hear this:
There is a strange beating / oscillation going on in the low end. We will come to that later on but that will be our end sound.
As we want the attack to be the metal sound, we need to use an envelope to modulation the x-morph position. We can use any three of them but as the first two are hard-cabled to the respective filters, lets use modulation envelope 3 for that. The default shape for this envelope is an instant attack decreasing curve, which is perfect for what we want.
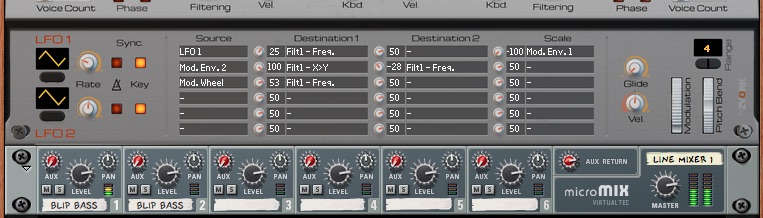
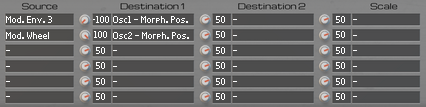
Configure the modulation matrix by setting on the first line the source to “Mod. Env. 3”, the destination to “Osc1 – Morph. Pos.” and the strength to -100. The default value of the morph position is set to 100% through the knob and we want it to be 0% on the attack, hence the -100 strength. If you are not familiar with the modulation matrix, we invite to read the documentation on Thor as Oberon’s modulation matrix is very similar. This is what the matrix should look like, once properly set:
Lets play the resulting patch:
I’m not quite satisfied with this. First of all the attack is a bit slow and second, the sustain sound is not quite what we had without the envelope modulation. But that’s just a few clicks away to resolve. We need to shorten our envelope and lower the sustain level to something that is similar to this:
Adding a layer
Lets move on by adding a new layer to our sound. This time we will take a look at oscillator 2 so lower oscillator 1’s level to 0, push up oscillator 2’s level to 0 dB and active oscillator 2. For the moment we have a flat triangle tone:
By default, oscillator 2’s morph feature takes oscillator 1 as a target spectrum. If we keep it that way we will morph towards the metal wave which is already what we are doing with the other oscillator. Instead, lets morph oscillator 2 to… oscillator 2! It sounds completely useless as is but is more interesting if we decide to morph oscillator 2’s spectrum to that same spectrum but transposed. Again, lets first listen to what this does.
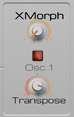
Configure oscillator 2’s x-morph section like the image below by clicking on disabling the “Osc. 1” button and turning the transpose knob to the left to the +19 semitones value.
Now play the patch while increasing the morph position:
The first thing we notice is that morphing between a transposed version of the same oscillator isn’t just a simple pitch bend. Some interesting low frequency growling appear that we could take advantage of. The other thing we can notice is that even with morphing at 100%, the resulting sound isn’t completely a triangle wave transposed higher. Well, now’s the time for an explanation.
Morph curve
By default, Oberon’s morph feature operates on the medium and high pitch partials of the spectrum, leaving the low pitch intact. This is to try to preserve the note pitch of the sound. So even at 100%, some parts of the spectrum correspond to the source spectrum while the rest are part of the destination spectrum. In between, some partials can be pitched half-way, yielding some inharmonicity. This is what we heard in our previous attempts.
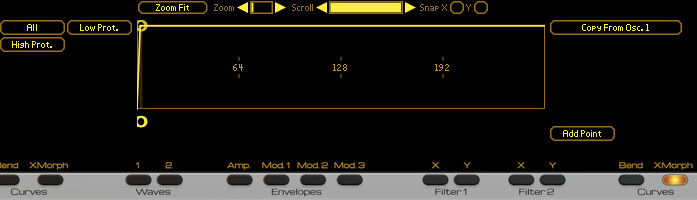
Thankfully, we can override this behavior easily as all this is done, again, through a curve. Click on the right side “XMorph” button of the display buttons “Curves” section. This controls the x-morph intensity for each part of the spectrum. Your central display should now look like this:
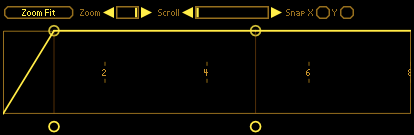
High level values of the curve indicate that x-morph should occur at full value at that position. As you can see, there are a few curve templates mainly for protecting the low end of the spectrum (which is basically the default) or on the contrary, the high end. The one that we are interested in is the “All” preset which sets morphing intensity to full value everywhere on the spectrum. Click on the “All” preset button and move the “Zoom” scrollbar fully to the right to have this display:
The numbers displayed (2, 4, 6, 8, …) indicate the harmonic rank positions. As you can see the curve rises directly to full value at where we can assume is the rank 1 (which corresponds to the note pitch, if you are now familiar with additive synthesis) position.
With that new curve, lets play our patch, again with an increasing morph position:
This time we can clearly hear a square wave, just an octave lower, when the morph position is at 100%
Finishing Touches
Now that we’ve hear what x-morphing to the same oscillator does, lets use this to our advantage and link that effect to the modulation wheel. Set oscillator 2’s x-morph position knob to 0%, set the source on the modulation matrix’s second line to “Mod. Wheel”, the destination to “Osc2 – Morph. Pos.” and this time intensity to 100%.
Turn back on oscillator 2 by pushing the corresponding level fader to 0 dB and slightly detune both oscillators a handful of cents (for instance -5 on oscillator 1 and +5 on oscillator 2). Now play a little tune while playing with the modulation wheel. You can even use some harmonize (like we did, at 75, with the harmonize octave set to -1) if you find it really too inharmonic:
Finally, to give it more character, lets apply a “Bell” template to our amplitude envelope curve and crank down the filter 1 frequency to around 600 Hz. Now we’ve go an interesting little metal pluck with a sort of larsen control on the modulation wheel:
8x Unison and Octave virtual voices per oscillator.
After discovering in the last tutorial the more complex features of Oberon, today things will be lighter… and fatter. Yes, in todays modern music, we like it when sounds get fat, thick and deep. With its two oscillators, Oberon can already give you a certain amount of that by layering these two oscillators together.
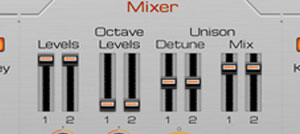
Mixer
At the center of Oberon lies the mixer which lets you control various levels of the synthesizer, including, most of all, the output levels of both oscillators controlled by the two left-most faders. By default, and in our current bell patch, you should notice that fader 1 is at full value and fader 2 at its lowest. Sure enough, only oscillator 1 can be heard. Push up fader 2 to the maximum value and press a key.
Nothing has changed, right? By default, oscillator 2 is disabled for performance reasons. It’s very easy to correct that as we just have to click on the enable button at the left of the “Oscillator 2” section label. Now play again. This is what should come out of your speakers on a C2 note:
You can listen only to oscillator 2 by lowering oscillator 1’s output level to the minimum. We recognize a saw wave with a modulated low pass filter. That’s perfectly logical as we can see that oscillator 2 is using Wave 1 (which is a saw wave by default), with the start at 0%. The oscillator is also routing its output to both filters in serial, hence the modulated low pass sound.
That saw wave on top of our bell sound isn’t really the character we want. Lets switch oscillator 2 to a softer and leaner triangle wave sound by turning oscillator 2’s start knob to 50%. We gain a stronger harmonic feel while keeping the bell characteristic:
We can furthermore tune oscillator 2 differently from the first one for a different sound. Here we’ve tuned it an octave higher by setting the Octave knob to +1 and slightly detuned it with a Fine knob at -7:
Layering oscillators is an effective way to enrich our sound. Unfortunately, it can sometimes be cumbersome to reconfigure entirely a second oscillator when you only want a slightly detuned copy of the first one.
Octave
Thankfully, Oberon can generate an exact copy of each oscillator but an octave higher. This is great for fat bass sounds or rich string sections. By the way, that copy is not done through a third or fourth oscillator so it is extremely efficient on your CPU.
In the mixer section, the two faders labelled “Octave Levels” control the levels of these two “octave copy” virtual oscillators. Push up oscillator 2’s octave level to the max:
The sound is brighter that’s for sure but we’re not quite convinced by the result. Let’s mute oscillator 2’s octave copy and turn up oscillator 1’s octave copy:
That’s more bell-like and there is also an unexpected chorus-like effect, too. Lets keep this.
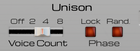
Unison
In the same manner that Oberon can generate lightweight octave copies of each oscillators, it can also create multiple slightly detuned (in the order of cents) copies of them. To do this, we first need to set the number of these virtual copies in the oscillator’s Unison section at the bottom. Lets start with 4. Instantly our bell sound becomes lush and dreamy:
Phase control
You may notice when listening carefully that the attack of our bell sometimes becomes softer or slower. This seems to be somewhat random. This is due to the difference in phase between each virtual copy and the original oscillator sound. When a new note is pressed, that start phase is different for each copy. When all copies and oscillator are nearly “in phase” we have a nice attack but when they are “out of phase”, the attack becomes softer because some virtual oscillators start out by canceling each other out. This is not really problematic for slow attack sounds but for us, it’s not quite satisfying.
Lock
Thankfully, we can counter that by enabling the Lock button of the unison phase section. That will ensure that at each note press, each oscillator is set to the same start phase. All copies are “in phase” with the oscillator. This will give us a very powerful attack and we might have to control that by lowering the gain. Lets hear what this does on our bell:
Sure enough, the attack of our bell is now strong and clear.
Random
If you feel that attack is too strong, we can enable the “Random” feature on the unison phase. This has the effect of randomizing the phase for each unison partial. With lock enabled, we will have random start phases for each unison partials but these phases will remain the same for each key pressed, which is exactly what we want. Lets listen to the result:
That sounds perfect: a nice lush consistent sound.
By the way, modifying the phase for each unison partial results in change in timbre, especially on harmonic sounds and can also be used for that effect.
Tuning and Mix
An important parameter for unison is the amount of detuning applied to these virtual copies. Low values will give slow phasing effects while high values will yield the famous “hoover sound”. Controlling that detune value is done in the mixer section with the Unison Detune faders. Lets first try changing the detune value of oscillator 1’s unison to a very low value of 4:
The sound is definitely thinner. Now lets try with a detune set to 75:
Very, very lush but it sounds almost out of tune. We can revert back to a lower detune value but lets try an alternate route by playing around with the Unison Mix.
The mix value controls the dry / wet mix between the direct oscillator output and the virtual unison copies. Lets lower that to 40%:
That’s certainly better as the “out of tune” feel is really under control now but will still retain that very high lushness to our sound.
To finish off this tutorial, lets crank up all these virtual copies to the maximum by putting oscillator 2’s octave level to the max and enabling an 8 voice unison on that same oscillator. How’s that for a nice lush bell sound?
Version 1.1 of the LeSpace Wide Rythmic Multi Echo now features six new audio inputs and audio outputs enabling you to insert any other Reason processing unit inside your echo lines’ feedback loops. Add a tape effect for a warmer sound or a distortion unit for a crazy echo sound!
New audio input and outputs available in version 1.1
On the music side, Ryo Okumoto, keyboard player for progressive rock band “Spock’s Beard”, and recent Reason convert is also a happy user of the Volt CB-1 & SH-1 rack extensions by Zvork. If you wan’t to hear what they are doing or even try to catch a glimpse of the Volt’s in action, their new album “Brief Nocturnes and Dreamless Sleep” will be out on March 01, 2013 followed by a tour in may.
Polybonk.com, an online music store specialising in independent music, has published three acid tracks by artist SH9 featuring the Volt CB-1. It might not be obvious to the ears but up to fifteen CB-1’s were used to create the rhythmic patterns and without the help of any automation, just progressive track mutes. As artist SH9 says : “no automation, all modulation”.