
After discovering in the last tutorial the more complex features of Oberon, today things will be lighter… and fatter. Yes, in todays modern music, we like it when sounds get fat, thick and deep. With its two oscillators, Oberon can already give you a certain amount of that by layering these two oscillators together.
Mixer
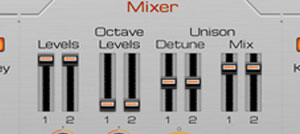
At the center of Oberon lies the mixer which lets you control various levels of the synthesizer, including, most of all, the output levels of both oscillators controlled by the two left-most faders. By default, and in our current bell patch, you should notice that fader 1 is at full value and fader 2 at its lowest. Sure enough, only oscillator 1 can be heard. Push up fader 2 to the maximum value and press a key.
 Nothing has changed, right? By default, oscillator 2 is disabled for performance reasons. It’s very easy to correct that as we just have to click on the enable button at the left of the “Oscillator 2” section label. Now play again. This is what should come out of your speakers on a C2 note:
You can listen only to oscillator 2 by lowering oscillator 1’s output level to the minimum. We recognize a saw wave with a modulated low pass filter. That’s perfectly logical as we can see that oscillator 2 is using Wave 1 (which is a saw wave by default), with the start at 0%. The oscillator is also routing its output to both filters in serial, hence the modulated low pass sound.
That saw wave on top of our bell sound isn’t really the character we want. Lets switch oscillator 2 to a softer and leaner triangle wave sound by turning oscillator 2’s start knob to 50%. We gain a stronger harmonic feel while keeping the bell characteristic:
We can furthermore tune oscillator 2 differently from the first one for a different sound. Here we’ve tuned it an octave higher by setting the Octave knob to +1 and slightly detuned it with a Fine knob at -7:
Layering oscillators is an effective way to enrich our sound. Unfortunately, it can sometimes be cumbersome to reconfigure entirely a second oscillator when you only want a slightly detuned copy of the first one.
Octave
Thankfully, Oberon can generate an exact copy of each oscillator but an octave higher. This is great for fat bass sounds or rich string sections. By the way, that copy is not done through a third or fourth oscillator so it is extremely efficient on your CPU.
In the mixer section, the two faders labelled “Octave Levels” control the levels of these two “octave copy” virtual oscillators. Push up oscillator 2’s octave level to the max:
The sound is brighter that’s for sure but we’re not quite convinced by the result. Let’s mute oscillator 2’s octave copy and turn up oscillator 1’s octave copy:
That’s more bell-like and there is also an unexpected chorus-like effect, too. Lets keep this.
Unison
 In the same manner that Oberon can generate lightweight octave copies of each oscillators, it can also create multiple slightly detuned (in the order of cents) copies of them. To do this, we first need to set the number of these virtual copies in the oscillator’s Unison section at the bottom. Lets start with 4. Instantly our bell sound becomes lush and dreamy:
Phase control
You may notice when listening carefully that the attack of our bell sometimes becomes softer or slower. This seems to be somewhat random. This is due to the difference in phase between each virtual copy and the original oscillator sound. When a new note is pressed, that start phase is different for each copy. When all copies and oscillator are nearly “in phase” we have a nice attack but when they are “out of phase”, the attack becomes softer because some virtual oscillators start out by canceling each other out. This is not really problematic for slow attack sounds but for us, it’s not quite satisfying.
Lock
Thankfully, we can counter that by enabling the Lock button of the unison phase section. That will ensure that at each note press, each oscillator is set to the same start phase. All copies are “in phase” with the oscillator. This will give us a very powerful attack and we might have to control that by lowering the gain. Lets hear what this does on our bell:
Sure enough, the attack of our bell is now strong and clear.
Random
If you feel that attack is too strong, we can enable the “Random” feature on the unison phase. This has the effect of randomizing the phase for each unison partial. With lock enabled, we will have random start phases for each unison partials but these phases will remain the same for each key pressed, which is exactly what we want. Lets listen to the result:
That sounds perfect: a nice lush consistent sound.
By the way, modifying the phase for each unison partial results in change in timbre, especially on harmonic sounds and can also be used for that effect.
Tuning and Mix
An important parameter for unison is the amount of detuning applied to these virtual copies. Low values will give slow phasing effects while high values will yield the famous “hoover sound”. Controlling that detune value is done in the mixer section with the Unison Detune faders. Lets first try changing the detune value of oscillator 1’s unison to a very low value of 4:
The sound is definitely thinner. Now lets try with a detune set to 75:
Very, very lush but it sounds almost out of tune. We can revert back to a lower detune value but lets try an alternate route by playing around with the Unison Mix.
The mix value controls the dry / wet mix between the direct oscillator output and the virtual unison copies. Lets lower that to 40%:
That’s certainly better as the “out of tune” feel is really under control now but will still retain that very high lushness to our sound.
To finish off this tutorial, lets crank up all these virtual copies to the maximum by putting oscillator 2’s octave level to the max and enabling an 8 voice unison on that same oscillator. How’s that for a nice lush bell sound?
