
In the previous tutorials we have manipulated Oberon in ways very similar to classic subtractive synthesis. For this third tutorial we will start using some features more specific to additive synthesis: bend, harmonize and partial clipping. All these features modify the spectrum of the sound at a partial level. But then again, under the hood, in additive synthesis, everything comes down to modifying the partials.
First of all, let’s start with a clean sheet by creating an Oberon instance and reseting it. Set the wave start of Oscillator 1 to 50% so as to use the second shape of Wave 1. You should hear a classic unfiltered triangle wave sound.
Partial Clipping
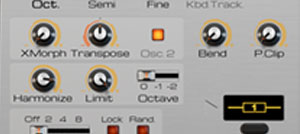
The first partial modifier we will explore is located at the bottom left of the Oscillator 1 section and is labelled “P.Clip”. To better understand what is happening, you can open the spectrum EQ window on the Oberon rack or just rely on your ears. Let’s first play a note while cranking up the P.Clip knob:
As you can hear, the sound gets brighter and harsher with increased partial clipping. If we put back the wave start to 0% to play a saw wave (the default Wave 1 shape 1, remember), the effect is even more noticeable and the sound is almost nasal:
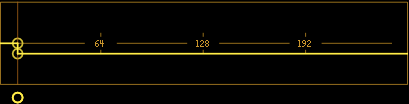
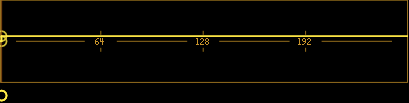
Looking back our spectrum EQ window, here are the two saw spectrums, one without partial clipping and the other with a full effect:
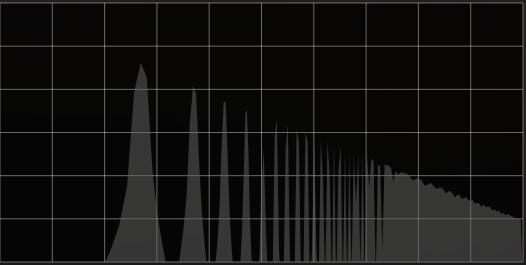
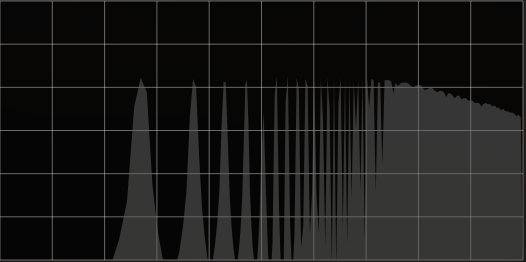
As you can maybe deduce, partial clipping has the effect of soft clipping the partial levels. In other words, it will boost low level sections of the spectrum while slightly lowering or at least maintaining high level sections. But then again, if we don’t want to delve into that much detail, we can also just see this as a “brighter” or “harsher” knob!
Let’s set back the wave start to 50% to have a triangle wave and put the partial clipping to around 75%. This will be our base timbre for the tutorial and it should sound like this on a C2 note:
Bend
For the moment we have just played around with spectrum levels but another nice aspect of additive synthesis is that we can also change the pitch of parts of the spectrum. Remember, additive synthesis lets us control individual portions of the spectrum through partials. This is done with Oberon with the Bend feature.
Again, prior to any explanation, lets just hear what this does:
It kind of sounds as if we were upwards pitch bending our sound but not quite as the timbre also changes to become metallic or bell like. Again, if we take a look at our spectrum window before and after bending, something pops up:


The peaks identifying the harmonics of the sound seem to have been displaced to the right of the spectrum, that is, to the higher frequencies. The effect seems also more pronounced as we go up in frequency. Let’s play a small melody, without and then with 50% bending:
As we can hear, the pitch or notes remain the same. It is just the timbre that changes to become really more metallic or glass like. That is pretty normal as the sound becomes less and less harmonic as the partial pitches are displaced from the harmonic frequencies, which is exactly what happens in bells, metal rods or very rigid strings: the frequencies produced are not harmonic. If you increase your guitar string tensions to an insane amount, apart from pitching the note up, you will also notice this effect.
If you don’t want to go into much detail, you can just stop there and consider the bend modifier to be analog to a “string tension”, “metallize” or “glassify” effect. If you are more curious and power hungry, let’s dive.
Bend curve
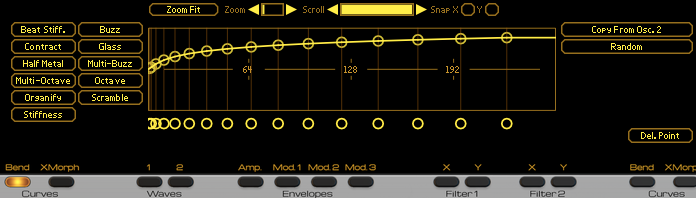
You may have noticed in the series of display buttons, next to the envelopes and waves, two buttons labeled “Bend”. It’s time we take a look so lets press the one on the left, associated with Oscillator 1. The top display changes to this:

Again, this should look familiar now that we’ve manipulated the envelopes and wave display but a big question arises: what does that curve manipulate? First of all, let’s play around with the different curve templates on the left.
To hear the full effect put back the oscillator 1 bend to 100%. Then let’s select “Buzz” and play:
A low frequency buzzing or beating can be heard, depending on the note played.
Now select template “Octave” and play around again:
This time the sound is harmonic but it has lost its characteristic “triangle / square” sound to become closer to saw timbre. Intriguing…
Finally, select template “Stiffness” and play:

That sounds like the original bend effect we started with and, as the name suggests, could correspond to an increasing string stiffness / tension.
Now, what exactly is going on here? Bending has the effect of increasing or diminishing the frequency spacing between partials in your oscillator’s spectrum. Said differently, it has the effect of contracting or stretching the frequencies of parts of your spectrum. With it you can mimic physical behaviors, like increased string tension, or completely crazy unpredictable stuff.
Curve points above the middle line will increase the frequency spacing and points underneath will contract it. The left start point of the curve is always the fundamental frequency of your note and that cannot be bent so as to keep your overall pitch intact. As we go towards the right side, the curve impacts higher harmonics.
With all this, we can understand the bend curves better. Lets start with the first “Buzz” curve. The lower harmonics are unchanged but higher harmonics are contracted, giving the illusion of a low frequency sound, hence the buzz or beating we hear.
With the “Octave” curve, we have the inverse effect. All harmonics except the fundamental have their pitch scaled up. We can’t really see it in the display but, believe me, they are scaled up by one octave. This is why the effect retains the harmonic character of the original sound. To position your bend curve points on octaves (either up or down), simply enable the “Snap Y” checkbox at the upper right of the curve display. This will have the effect of snapping your points vertically to octave positions.
Finally, with the “Stiffness” curve, we can see that, as we deduced from looking at the spectrum EQ window, as we go higher up the spectrum, the partial pitches are more and more stretched upwards. This, again, replicates the harmonic distortion of a very stiff string.
Ok, enough theory and curve manipulation.
Creating a bell sound
With this bending feature, it is extremely easy to create bell sounds. Just crank up the bend and add some filtering. Thankfully, there is a “Bell” envelope preset we can use both for the amplitude and modulation 1 envelopes. Here’s our try on a bell patch with bend set to 100% with the default “Stiffness” curve, the filter 1 frequency set to 700Hz and both amplitude and modulation 1 envelopes set to “Bell”. We’ve just moved the amplitude envelope’s sustain point to around 3 seconds for a longer decay. Listen to this:
I don’t know what you think of this but, although it may sound realistic, there is a slight off-tune character to the patch that I don’t really like. Let’s see how we can fix this.
Harmonize
That slightly off-tune characteristic of our patch is due to its inharmonic nature. We could counter balance this by reducing the bend but that might alter our timbre too much. Thankfully, we have a second option with the Harmonize knob.
Harmonize is a very simple but effective mean of forcing your oscillator back to musical territory. It gently pitches back all your partials to the nearest harmonic frequency. We can hear this by increasing the harmonize strength as we play:
There is a slight change of timbre but much less pronounced than with altering the bend. If you are still not satisfied, we have another trick up our sleeves. By default, the harmonize feature forces back the partials to harmonic frequencies of the current note. We can instead ask to use the harmonic frequencies of the same note but one or even two octaves below. This will keep our sound harmonic but with sub-octave harmonics. Since sub-octave harmonics are closer appart (the distance between two harmonics is exactly the note frequency, remember), our harmonized oscillator will have a higher chance of sounding like the original oscillator.
Let’s try this on our tune with harmonize set to the full value at the default “0” octave setting, then the “-1” value and finally the “-2” octave setting:
Still not satisfied?
Limit
We have another trick with the Limit setting of our harmonize feature. By default, the harmonize works on all parts of the spectrum. But with the limit knob we can decide to limit the effect to the low end thus keeping some inharmonic partials in the high frequencies while retaining the benefit of harmonize and keep a more distinct note pitch which is essentially determined by the lower harmonics.
To hear this, put the octave setting back to 0 and play with the limit by turning the knob to the left until you are satisfied. We want to keep a metallic aspect to our sound but we wish to keep it in tune. To our ears, putting the limit around 33 sounds just fine: