Posted on

Oberon – Tutorial 2 : Filters

Filters
Filter controls

In the previous tutorial, we explored how to define the basic timbre of an oscillator. Although Oberon is an additive synthesizer at its core, it has a number of features that resemble the classic subtractive architecture that is the basis for most of the synthesizers from the very start. Most importantly, it also has filters.

Filters are great to quickly sculpt your sound by removing or boosting large portions of your spectrum. Classically, a synthesizer filter consists of a low pass profile which attenuates frequencies above a certain frequency value. Modern synthesizers can switch to alternate profiles like high pass or band pass.

Oberon offers two filters which are identical in nature. As we will see, each of them can alter the sound of both oscillators. But lets see how things are done in Oberon.

Frequency

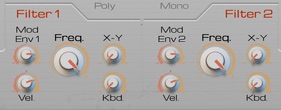
This should be very familiar to you as this controls the cutoff frequency of the filter. By default, both filters have a low pass profile. You can verify this by pressing a key and playing around with Filter 1’s frequency parameter. In the following example, we’ve set the frequency value to a low value of around 200Hz. If you proceeded from tutorial 1, you should hear something like this, much less brighter than the sound we had at the end of tutorial 1.

Envelope modulation

If you listen carefully, you should notice that the attack of the sound is much brighter than the sustain part. Something is amiss with the filter frequency. There is no bug or magic there but just the effect of modulation envelope 1 modifying the filter frequency over time. Both filters 1 & 2 have their frequency parameter modulated by respectively modulation envelope 1 & 2. The amount of modulation is controlled through respectively the Mod Env 1 & Mod Env 2 knobs to the left of the filter frequency knobs. As you can see, by default there is a fair amount of modulation going on. Try setting it to 0 (middle position) and you should hear a sound that is fairly dull and static:

The modulation depth of the envelope can furthermore be modified by the velocity. This is great for dynamic bass sounds for example and is controlled by the Vel knob just underneath the modulation envelope knobs. If you set the velocity knob to full value and the modulation envelope depth back to the original value of 65, a low velocity note will have almost no envelope modulation, while high velocity notes will have the full modulation depth of 65. This is an example of what it should sound like playing notes with gradually more velocity:

Editing the envelope

To edit the modulation envelope 1, which is the one modifying the filter 1 frequency, click on the Mod 1 button of the Envelopes display section just underneath the top central display. You should see this:

Modulation Envelope 1Just like the wave curve display, to the left are a list of envelope templates, crazy or classic, to let you quickly set your envelopes. But of course, you can also modify them by moving the points around and adding / removing them. You should notice something new, though.

First of all, above the curve frame is a small “S” label. This identifies the sustain point. If you wish to modify this, just click on one of the rounded boxes above each point. In Oberon, all points before the sustain point are considered part of the attack while all points after are considered part of the release.

Lets try to create a more “picked bass” sound by shortening the envelope attack. You can do this by dragging the sustain point to the left or by using the quick edit button to the right of the curve display labelled “Shorter Att.”. This will scale down in time all points before the sustain point. Here’s our modulation envelope after shortening the attack:

Shorter modulation envelope 1 attack

To have even more dynamic velocity in our sound we’ve increased the filter 1 modulation envelope 1 depth to the full value and brightened it up a little by increasing the filter frequency to around 560Hz. With our new envelope, here’s our sound with increasing velocity:

Filter Curves

Now that we’ve played around with the cutoff frequency, the most acute readers among you should wonder if Oberon has any resonance setting. The answer is: yes, and even more. To the top right of the frequency knob you should see a small knob labelled “X-Y”. Try increasing it to the full value and listen to the sound:

Sure enough, we recognize the typical funky squeal sound characteristic of a high resonance value. So why call this knob “X-Y”?

In Oberon, there is no such thing as “resonance”. The synthesizer uses a more broader scheme based on two filter profiles for each filter. Each filter has an X profile and a Y profile. By default, filter 1, for instance, has a low pass profile assigned to the X profile and a resonant low pass profile assigned to the Y profile. Changing the X-Y knob towards the right (towards Y) gradually morphs the final filter between this flat low pass profile to a squeaky resonant low pass profile.

Now the interesting part is that each X and Y profile can be edited for both filters the same way as wave forms or envelopes can. This implies that you can very well decide that the X profile is a low pass profile and the Y profile a high pass profile. Lets see this in action by clicking on the X button of the Filter 1 display. Here’s how your display should look like:

Fitler 1 X curveAll this should now be familiar as you recognize a list of curve templates to the left, with the classic low pass, band pass, high pass profiles and some other more esoteric ones. Sure enough, the X filter curve which defines the X profile looks definitely like a low pass filter. The low end is at 0dB gain. Every point above it creates a gain (like a resonance), while every point underneath creates a cut (like a notch). In fact, if you are accustomed to graphical equalizers, you should feel right at home.

At the center of the display, labelled “0 semi” is the cutoff frequency. Everything to the right is above the cutoff frequency and everything to the left are lower frequencies. The labels “-4 oct.” and “4 oct.” indicate that at this horizontal position, the frequency is 4 octaves lower or higher, respectively than the cutoff frequency.

Lets switch to the Y curve by clicking on the neighboring Y button:

Filter 1 Y curve

The peak is our resonance and as we can see, it is perfectly centered on our cutoff frequency. This is not an obligation and we can easily change this with the usual point dragging and “Add / Remove point” features. Lets try something complicated with two resonance-like peaks like this:

Double resonanceWith the filter 1 X-Y knob fully turned to the right and with a slight global volume attenuation to prevent clipping, this is what it sounds like:

Now with the X-Y knob on filter 1 we can go from a normal low pass filter (approximately sounding like a 24 dB/octave filter) to a low pass filter with character. If you wish you can link the modulation wheel to the filter 1 X-Y parameter with the modulation matrix.

Repeat

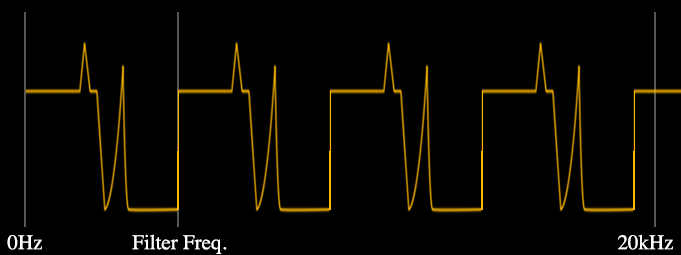
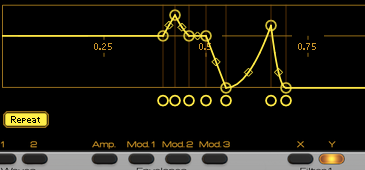
There is another little thing we can do with filters and that is to repeat the filter response. You may have noticed this weird “Repeat” button under the filter curve to the left. Pressing this will change how the curve is applied as a filter response. When activated, the response is repeated across the frequency spectrum with a period defined by the filter frequency. For instance, if we activate repeat on our current filter setting with a filter frequency of 550 Hz, the filter curve controls the gain and attenuation of the spectrum for a 550 Hz wide band that is repeated every 550 Hz.

Filter repeat

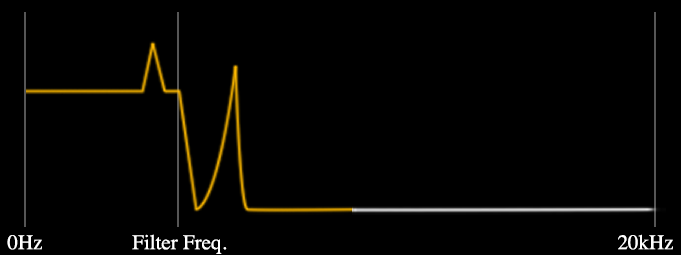
Again, using the spectrum EQ window will makes things clearer but here is a diagram showing the differences with non repeated filter curves first then repeated filter curves.

Non repeated filter curve Repeated filter curve

Repetitive filters like this are not uncommon in classic subtractive synthesis. Comb filters behave exactly the same way with repetitive peaks or repetitive notches.

Lets listen to our patch with repeat activated:

Filter Modes
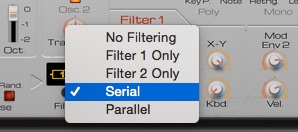
Filtering ModesTo finish off this tutorial on filters, we will take a look on how both filters are applied on oscillators.

By default filter 1 & 2 are applied in sequence / serial. Pressing the button over the “Filtering” label between the oscillator and filter sections reveals a popup menu with all the available filtering modes for each oscillator.

For performance reasons, it is sometimes interesting to switch to no-filtering or to a single filter only if the other has no effect. Just to be tidy, we will switch to Filter 1 Only. Hopefully the sound should remain the same!

Posted on

Oberon – Tutorial 1 : Waves

Two oscillators with identical parameters.

Creating a patch with the Oberon Synthesizer always starts with the oscillator section. This is where the raw sound is produced. If you are a bit familiar with basic synthesizer architectures like the ones found in the Reason stock devices Subtractor or Thor, you should feel confortable with Oberon’s oscillator section, at least for the basic settings. If not, we invite you to read a first brief Introduction to subtractive synthesis which is the heart of these architectures.

First of all, lets start with a clean sheet by creating an instance of Oberon and reseting the device (right click on the device and choose “Reset Device”). For this tutorial, we will only use the first oscillator, which is the only one active by default. So no need to change anything for the moment.

Basic Settings

Tuning

Lets first get rid of the obvious and very basic settings, the pitch. By default, the pitch of a sound is determined by the note of the key you press. For instance, the C4 key generates a sound at a corresponding C4 pitch, which generally corresponds to frequency around 261-262 Hz. We can transpose this by octaves using the Octave knob, lowering the pitch for negative octave values and vice versa with positive values between -4 and +4. Likewise, the Semi knob transposes the pitch by semitone increments, between +0 and +11. Finally, the Fine setting lets you do micro adjustments to the pitch by 1/100th of semitones. This is great when both of Oberon’s oscillators are activated, each one slightly detuned for that very classic fat lush sound. But lets stick to one oscillator for the moment.

You can keep the pitch to the default setting for the time being. If you press the C2 key you should hear a beautiful rich sawtooth wave that sounds like this:

Stereo

If you have a stereo speaker setup or, even better, headphones you should hear the above sound as a mono fully Pan and Widthcentered sound. Both oscillators in Oberon have a separate Pan and Width knob to control the placement and width in stereo space. Oscillator 1 settings are the left knobs.

While the pan setting is fairly obvious, the width needs some extra explanation. Due to the nature of its audio engine, Oberon can spread the spectrum of its oscillators across the stereo field making each oscillator true stereo oscillators. This may alter the timbre slightly as parts of the spectrum will be completely to one side leaving “holes” in the spectrum on the other side. Hopefully, when the width is to the maximum, you should feel the stereo field is pretty well balanced.

Press the C2 key while progressively increasing the width of oscillator 1 and you should hear something like this (headphones or stereo speakers required, of course):

Ok, lets keep the width to a low level just to have a slight width by setting it between 15 and 17.

Controlling Timbre

Wave types

Sawteeth are great but, thankfully, the Oberon oscillators can generate much more. Right at the top of the Wave Typesoscillator section is a display with the name of the current wave, here “Wave 1”, which corresponds to a sawtooth. The type of the wave defines the timbre of the oscillator.

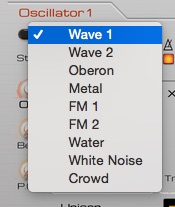
If you press the button to the left of oscillator 1’s wave type display, a popup menu appears with the list of all available waves. As we will see later on, waves 1 & 2 are a bit special. You can change the wave types and listen to the different timbres they produce. Some of them sound frankly out of tune and not very musical, especially the Metal, Water, White Noise and Crowd ones. These waves are “inharmonic” or not harmonic.

Choose the Oberon wave. It should sound like this on a C2:

It is not the sexiest sound in the world.

Wave sequences

In classic subtractive synthesizers, a wave is defined by its shape in time. By repeatedly playing that shape, the synthesizer creates a periodic musical sound with a defined pitch. The shape defines the timbre and the duration of the shape defines its pitch. By changing that shape over time, instead of repeating it but by keeping the same shape duration, a synthesizer can generated a sound of evolving timbre but of constant pitch. A wave table or wave sequence, is a sequence of shapes that defines what shape the oscillator should generate depending on a position in that sequence. That position can be static, in which case the oscillator produces repeatedly the same shape, or in movement backwards or forward, at different speed levels.

In Oberon, things are slightly different due to its more generic additive engine. To each wave shape corresponds a corresponding sound spectrum. The two are completely analog and are two different ways of identifying a timbre either by looking at it in the time domain or in the spectral / frequency domain. This is even more obvious and is a nice way of working with Oberon when sound designing when you display the spectrum EQ window of Reason.

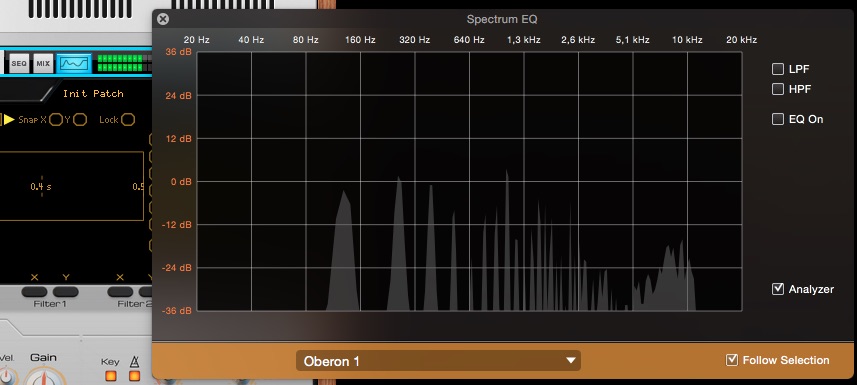
If you press, again, the C2 key on your keyboard you should have something like this displayed in your spectrum window:

Oberon Spectrum You can notice, if you keep the key down, that the spectrum is static and doesn’t change over time.

Oberon waves are in fact wave sequences. By default, the first “wave form” is used. “Wave form” isn’t an appropriate term in Oberon as it suggests, as in classic subtractive synthesis, that they are defined shapes that are played repeatedly. In Oberon, wave sequences are really spectrum sequences. Each entry in the sequence is a different spectrum. That may seem like not much of a difference but in fact it makes a huge difference because a spectrum may not necessarily correspond to a periodic musical sound. If you listen to the Metal or White Noise waves, for instance or even better, record them and have a look at their shape, you will notice that they do not sound musical, don’t have a really defined pitch and absolutely don’t have a periodic wave shape!

By working with spectrum sequences, Oberon can create timbres that evolve from periodic musical tones to completely metallic inharmonic ones, which is totally impossible to do with classic synthesis.

Wave Start

The Start knob in the oscillator section defines the position in the sequence that the oscillator should use to look-up the spectrum for the timbre. Each wave type has a different number of spectrums in their sequence but all sequences loop back to the first spectrum when start is set to 100%: the spectrum at 0% is the same as 100%.

With the wave type set to Oberon, if you press the C2 key and play around with the start knob, you should hear something like this:

Notice how the display in the spectrum EQ window changes with each change of the start parameter.

Wave motion

While moving the start knob manually can give fun results, half of the time, we would like the sequence to play automatically. The Motion knob controls the speed of the sequence play back. When you press a key, the first spectrum played is the one indexed by the start position. Afterwards, Oberon automatically increases the position based on the motion parameter until you release the key. Of course, by default, each note has an independent sequence position but that can be changed by disabling the key sync button.

This motion can be set to move forward in the sequence, or backwards but the sequence position will always loop. The motion speed is by default synced to the song tempo but again, this can be changed.

Lets play our Oberon wave with a bit of forward motion. Set the start to 0% and the motion to 1/1 by turning the motion knob about half-way to the right. A motion at 1/1 indicates that the wave sequence will be looped every bar. Press our faithful C2 key and you should here an emotionally devoid robot repeatedly saying “Thisss izzzzz Oberrrr-t-on”. Or something fairly close.

If you press different keys on your keyboard you should notice that the speed of the phrase remains the same while being pitched accordingly.

Editable waves

When we first presented the wave types, we stated that Waves 1 & 2 were special. But in what way? Well, they are editable. Waves 1 & 2 are very simple wave sequences made each of two wave forms / spectrums. Since, again, every wave in Oberon loops back on its start spectrum, if you choose Wave 1 or 2 as a wave type, the first wave form of the sequence is played when the start is at 0% or 100% and the second wave form is used when the start is at 50%.

To get a look at the default wave forms used for Wave 1, for instance, just click on the button labeled “1” of the two “Waves” buttons. Pressing these buttons changes the big central display of Oberon to the current wave, where, by default, it displays the amplitude envelope. If you want to go back to the amplitude envelope, just click on the “Amp” button of the “Envelopes” buttons. If you pressed the Wave 1 display button here is what you should see:

Wave 1 start curve

As you can recognize, this is a descending sawtooth. To the left of the central display are a series of wave shape templates. Clicking on them will apply the templates to the curve. Try clicking on CZ for instance and you should see this shape:

CZ wave shape

To hear what this sounds like, choose the Wave 1 wave type on oscillator 1, set the start knob to 0% and don’t forget to put back the motion knob back to “Off”. Hopefully, on our classic C2, this is what you should hear:

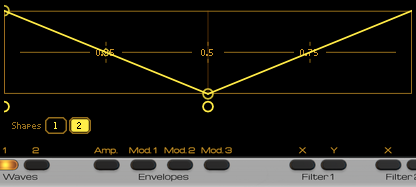
To display the second shape of the Wave 1 sequence, we must click on the “2” shapes button just at the lower left of the curve display. This is what you should see, a beautiful triangle wave:

Wave 1 shape 2Put back some motion in there by setting the motion parameter to 1/4 and we should here a rich pulsating timbre that pulses every quarter note:

Now, for the fun part. Lets modify the second shape of Wave 1. Click and drag the existing shape curve buttons and use the “Add Point” / “Delete Point” features to create a shape that ressembles this:

Custom wave shape

To listen to this wave shape, we must set the start to 50% and turn off motion:

Put back some motion, for instance at 2/1, and we have a nice bright growling bass when played on low notes:

You can now play around with all this and then join us for the next tutorial.

Posted on

Oberon discounts for LeSpace and Noxious owners

If you are a current owner of our LeSpace or Noxious Rack Extensions for Propellerhead Software​’s Reason and would like to get your hands on our latest Oberon Synthesizer, we now offer discounts!
-10% on Oberon for LeSpace owners
-20% on Oberon for Noxious owners
To be eligible, just send an email to contact@zvork.fr with a copy of your email receipt for LeSpace or Noxious. We will reply as quickly as possible with your voucher code.

Posted on

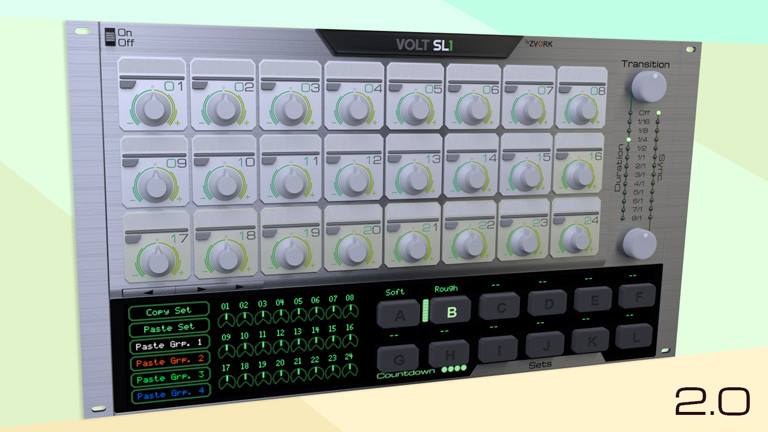
Volt SL-1 version 2.0

Our control voltage selector Rack Extension, the Volt SL-1, has just come out with a major update. Taking advantage of new advances in the Rack Extension platform introduced with Reason 7.0, this new version adds a number of useful features:

  • 9 more controls for a total of 24 controls per set,
  • 4 color coded groups to better organise your controls,
  • Per control linear or non-standard transition curves,
  • Copy and paste functionality to copy control values from on set to another,
  • Extra CV outputs for each control to reduce cable clutter.

This new update is available in the Propellerhead Shop for 15€ / 19$ for new users, and as a 7€50 / 9$ upgrade for previous owners of the Rack Extension.

Please note that this version will only work with Reason 7+.

Posted on

Noxious ReFill by Navi Retlav Studio

Navi Retlav Studio has just released an amazing ReFill for our Noxious Additive Wave Synthesizer. 150 new wonderful patches perfectly complete the sonic palette of the default presets, especially if you are into electronic music. If you are a Noxious user, checking out the demo is an absolute must, and for 19$, it’s a deal.
http://naviretlav.com/RErefill

Posted on

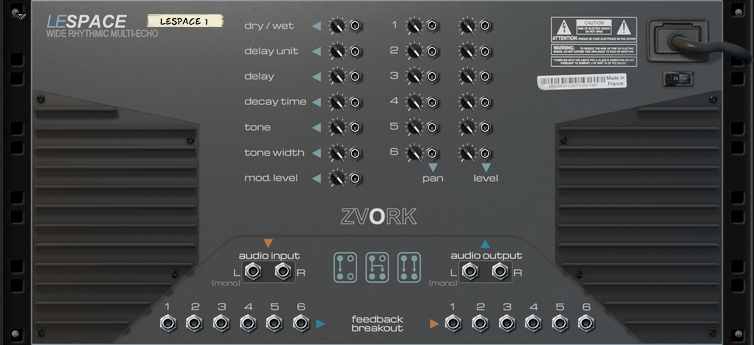
LeSpace version 1.1 with feedback breakout path

Version 1.1 of the LeSpace Wide Rythmic Multi Echo now features six new audio inputs and audio outputs enabling you to insert any other Reason processing unit inside your echo lines’ feedback loops. Add a tape effect for a warmer sound or a distortion unit for a crazy echo sound!

New audio input and outputs available in version 1.1

All this comes for free for current LeSpace owners at the Propellerhead Shop, of course.

To get a preview of this new feature, check out this new tutorial video: