We’re very happy to announce that the new major release for Oberon 2 is now available in the Propellerhead Shop.
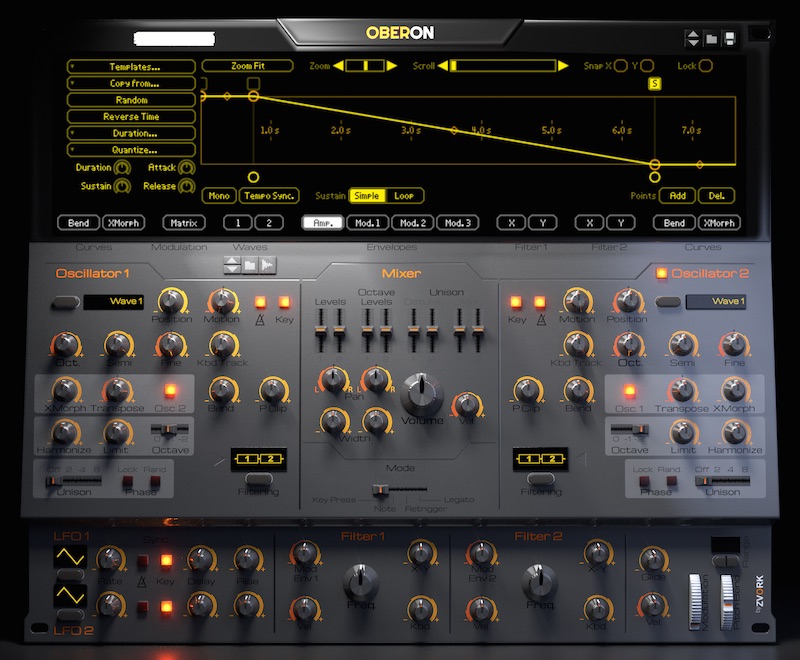
Based on an optimized additive engine, Oberon 2 now builds on the recent 2.5 version of Propellerhead’s Rack Extension SDK to add new powerful sound design features. The synthesizer still features an architecture of two editable filters fed by two additive spectrum sequence oscillators, with bend and morph capabilities, modulated by two LFO’s and three multi-point editable envelopes through a six entry modulation matrix.
Sample loading
Now, users can import up to two simultaneous audio samples of any format supported by Reason into one of the two user wave sequences. Audio samples are analyzed into a sequence of evolving partial spectrums which can then be played by the oscillators. Play complete samples, single cycle wave forms or freeze onto a specific time. Either way, this opens up new possibilities combined with Oberon’s morph and filtering capabilities.
Wave modifiers
Even without audio samples, Oberon’s sound design process has been greatly improved. The introduction of two modifiers on top of the existing user drawable wave form sequences lets you modulate these wave forms in a non destructive way. Each modifier shares the same list of possible operators such as FM, sync, clipping, bit reduction or analog sounding filtering. Since each wave form of the original two step sequence has its unique two modifiers, morphing between a FM wave form and an analog sounding synced wave is now possible.
Enhanced envelopes
Oberon’s 16 point curve based envelopes where already powerful but their loop section was constrained to begin at the first point. With version 2, the start of the sustain loop can be anywhere on the envelope curve. Even the release section now has a separate loop option. Combined with an improved user interface for envelope editing, such as quantize on all four sections, giving movement to your sound is easier than ever.
Workflow enhancements
The latest Rack Extension SDK features let us improve the user interface, especially the main editing display. Each curve type features more templates, quicker functions, sorted menus in a more compact form, leaving more space for the curve display. The modulation matrix has migrated to this central display, giving the interface a less cluttered feel. The two LFO’s now gained a delay and rise parameter for more subtle modulations. For those of you who wish to integrate Oberon inside Blamsof’s Polymodular system, we’ve added a new audio output mode for more compatibility.
Available for Reason 9.2 and above
This version is available only for owners of Reason 9.2 and above at 99$ / 99€ or as a paid upgrade for existing Oberon license owners at 20$ / 20€. Oberon is also available as a bundle with the Noxious additive synthesizer and LeSpace multi-delay at a lower combined price.
We are officially announcing that a major upgrade to Oberon is in the pipeline. This will be a paid upgrade and will benefit from the new Reason SDK. This implies it will be available only to Reason 9.2+ owners but offers a number of new features:
Back to work after some refreshing and inspiring summer vacations? Now’s the time to get back composing and be creative. To help you out, we’ve dropped the prices of our audio rack extension lineup for Propellerhead Software’s Reason by up to 60% until september 5th!!
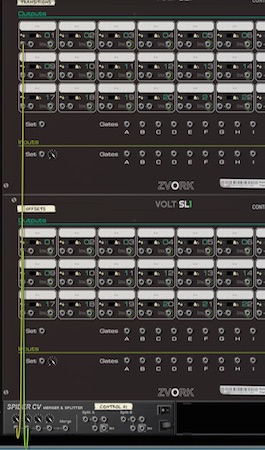
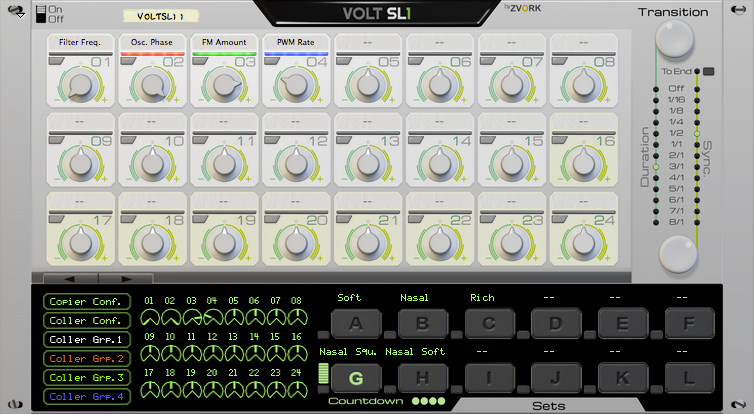
A number of you have had the issue of trying to map physical controllers either through MIDI or Remote to the Volt SL-1 control knobs only to discover that this has to be done for every control of every set. Each time, the current set is changed, the controls are no longer mapped. How frustrating, and we understand. Now why is this necessary? How more illogical can this be? Why the heck have we made it so complicated?
Well, it is due to how remote / MIDI mapping works in Reason and / or how rack extension GUI works. The mapping of knobs to MIDI controllers (or remote controllers) is in fact a misunderstanding. You are in fact mapping device properties to MIDI controllers, not the physical UI knob. A RE knob (button, fader, etc.) is itself mapped to that same property. The Volt SL-1 works by switching the properties mapped to each control knob when you switch sets. But the MIDI mapping still remains linked to the same property, which is no longer mapped to the control knob.
Why do we do this, that is, change the properties linked to each knob, instead of keeping the same properties for each control knob and just change the value of that property when we change sets? Well, that’s because the RE SDK doesn’t allow us to do this. A RE engine cannot change the values of its properties, unless they are purely visual feedbacks like meters or blinking lights. In a nutshell, the RE engine can’t modify properties that the user can modify at the same time. I can’t really go into much detail as this would break the NDA every RE developer has signed with the Props.
Another point to understand is that for a certain number of physical MIDI controllers, what you are asking won’t be perfect too because if we changed sets on the Volt SL-1, in some way, your physical MIDI knobs should rotate to the correct position. Unless you have alpha dials with a LCD display, this won’t be practical.
Transition and Offset SL-1’s with CV merge
The besk workaround we’ve found, is to use 2 Volt SL-1s. The first one is used for the basic set transitions, and can be considered like your usual SL-1. The second one is an “offset” controller that will remain on the same set all the time. This one you can map to your MIDI Controllers. Then, on the back panels, you just have to merge the CV control outputs of the first SL-1 with the second one in bipolar mode, for each controls you are using, and then use that signal as usual. Your MIDI controller can then be used to offset the control values (not replace them). It creates a whole lot of cable clutter, but it works.
Since we don’t want you to loose time on this, a ready-made combinator is available to download with this particular setup.
Oberon and Noxious have just been updated to respectively version 1.1 and 1.6 with full support for Blamsoft’s PolyCV polyphonic CV protocol. Now you can control Oberon or Noxious with external Rack Extension devices that support this protocol and send polyphonic note commands across CV cables.
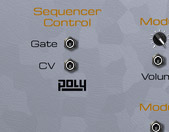
If you have a doubt on what version you are working with and need support for PolyCV, just check the back panels and a visible “PolyCV” logo should be just under the gate and CV outputs in the “Sequencer Control” sections.
Noxious back panel with PolyCVOberon back panel with PolyCV
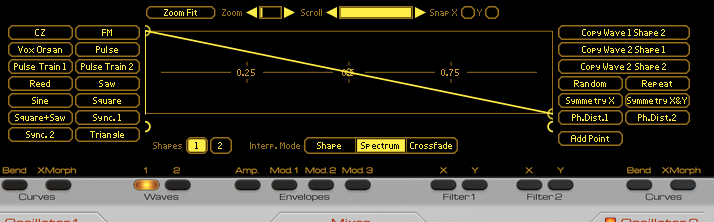
Oberon users will also be treated with a new user wave interpolation mode that enhances the possibilities of the user drawable wave forms by providing two different new interpolation methods between the start and end waves for both Wave 1 and Wave 2. Some new cool patches are also included that demonstrate this. You should also check out this video tutorial that also gives a small presentation of the feature.
On top of that 8 new Pitch CV outputs for each 8 separate audio outputs have been added to help out those of you who use Oberon in a modular setup.
Version 2.1 of the Volt SL-1 Rack Extension for Propellerhead Software’s Reason DAW adds a small number of features that enhance your user experience:
Three new stepped transition curves for rhythmic transitions,
Trigger buttons for each set to transition to a set while keeping the active set for edition. This can also be used to map remote controls to each individual set activation, something that has been requested for some time,
Unipolar or bipolar CV control output,
And finally, the ability to synchronize the end of a transition and not just the start as with previous versions.
The update is totally free for current owners of version 2.0 and is already available in the Propellerhead Shop.
After exploring the front panel of the Oberon Synthesizer, now is the time to have a look at the back panel. There lies a feature that can enable some creative sound construction and some interesting combinations between Oberon and other rack devices.
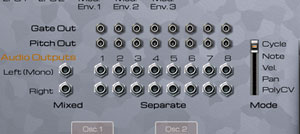
Apart from the classic CV inputs and outputs for modulation and CV note control, you should notice right at the center a great number of audio outputs.
Audio Outputs
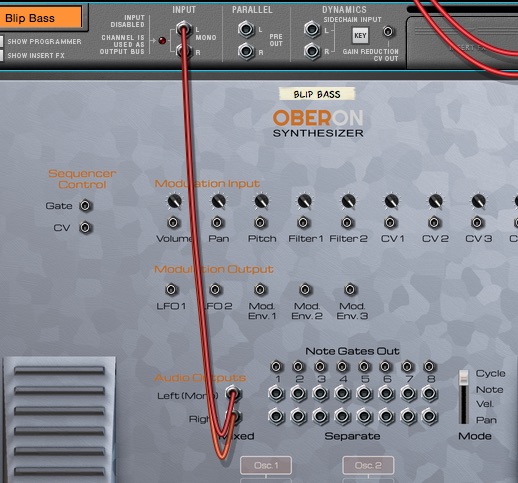
Lets start with a new song. Create an Oberon device and select the “Blip Bass” patch in the “- By Category / Bass” folder of the Oberon Synthesizer patches. Now switch to the back panel with the TAB key. When an instrument is created in Reason, the device’s main output is automatically connected to the device’s channel mix audio input. As you can notice, Oberon’s “Mixed” audio output is connected. This is the stereo output with all the voices mixed into one single stereo stream, which is what we need 99% of the time.
To the right of this mixed stereo output lie 8 stereo audio output pairs numbered from 1 to 8. Lets disconnect the mixed audio output from the canal mix and connect it back to the stereo separate output 1.
If you play the patch, you can notice that there is absolutely no difference in output. You can try switching to output 1, 2, 3 or any other of the 8 separate outputs, it will make no difference. So are those separate outputs only replicates of the main mixed output?
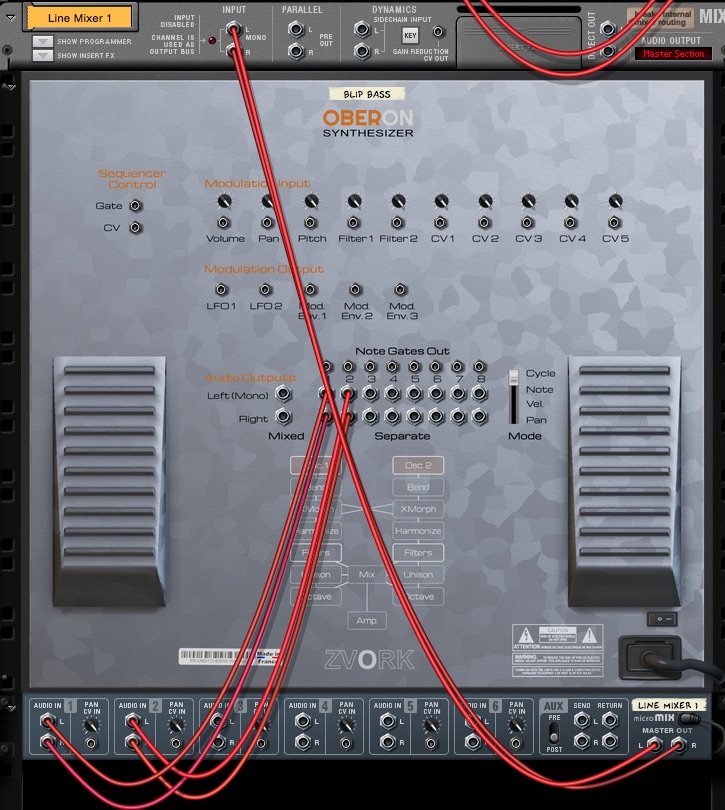
No, of course. Things get more interesting once you use more than one. Lets create a Line Mixer 6:2 device and delete the Channel Mix device that was automatically created with it. We won’t need it as we will use the one created with Oberon. Now connect Oberon’s separate output 1 to the first channel of the mixer and separate output 2 to the second channel. Now connect the mixer output to the Oberon channel mix input:
Again, if you play the patch, you shouldn’t hear a difference. But switch back to the front panel and look at the VU meters of the channel mixer’s first two channels. Notice how each time you press a different note it is a different channel that receives audio? In fact, at each key press, even if it is the same note, it alternates from one channel to another.
This gets even more apparent if you connect a third separate output to the channel mixer. For instance, connect separate output 5 to the third channel mixer input. This time the output of each voice cycles through all three connected outputs.
Output Modes
This behavior of “cycling” through the different connected separate outputs is the default output mode, but this can be changed. To the right of all the separate stereo output pairs is a vertical fader switch with four different states. By default, it is on “Cycle” which exactly what we are experiencing. Switch that to “Note” and play. Be generous and use the entire keyboard span.
This time, the voices played are sent to the outputs depending on the note pressed. Low notes are sent to output 1, mid notes to output 2 and high notes to output 5.
Now switch to output mode “Vel.”, for velocity and play. As the term coins, this time the voices are sent to the outputs based on their key velocity. Low velocity voices are sent to output 1, mid velocity ones are sent to output 2 and high velocity ones are sent to output 5.
As you can imagine (and you can try it out for yourself), using output mode “Pan” distributes the voices to the connected separate outputs based on the stereo pan value of the notes.
Lets switch back to “Cycle” mode and see what we can do with all this.
Varying effects
With all these separate outputs we can apply effects to the Oberon Synthesizer differently for each note. Lets connect a fourth separate output to the channel mixer, for instance separate output 8. As you should understand by now, the exact separate output number doesn’t really matter as Oberon only considers the connected outputs. In between each separate Oberon audio outputs and the mixer channels, we will insert an effect device, different for each output.
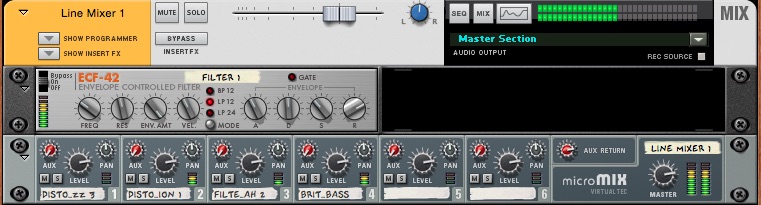
We used the Softube Amp and Bass Amp device patches for that and created four instances with these patches:
Distortion – Amp Fuzz 3
Distortion – Amp Distortion 1
Filter – Amp Wah 2
Brit Sound Bass
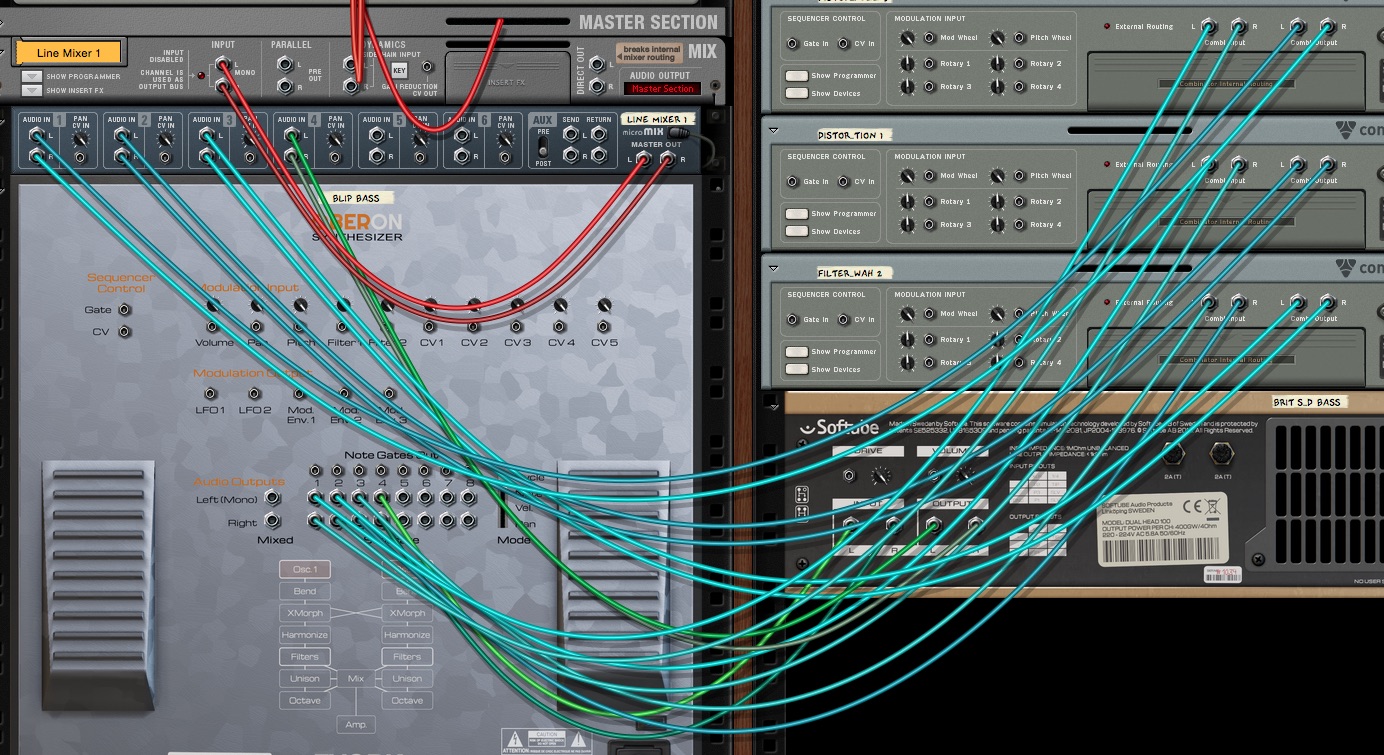
Now connect separate output 1 to the first effect input, separate output 2 to the second effect, separate output 5 to the third effect and separate output 8 to the fourth effect. Finally connect the output of the first effect to the mixer channel 1 input and repeat the process for the remaining three effects. You should have something like this (mind the spaghetti):
To test if this is working, press a single key multiple times. You should here the Blip Bass patch being played in cycle through all four effects for something that sounds like this on a C2:
To put this into context, we’ve created a Matrix sequence that we have connected to Oberon.
Here is the raw loop without effects followed by the same loop with the cycling effects:
And here’s that same loop with effects but this time with the separate output mode set on “Vel.”:
Separate Note Gates
There is another feature we can use to spice up our loop. Oberon has separate audio outputs but it can also output a CV gate signal each time a note is sent to each connected separate output. This of course reacts to the current separate output mode.
We can use this to our effect by applying a time varying filter that will trigger each time a note is sent to one of our separate outputs. For instance we can decide that each time a voice is sent to separate output 2, an envelope controlled filter ECF-42 is triggered on our Mixer output.
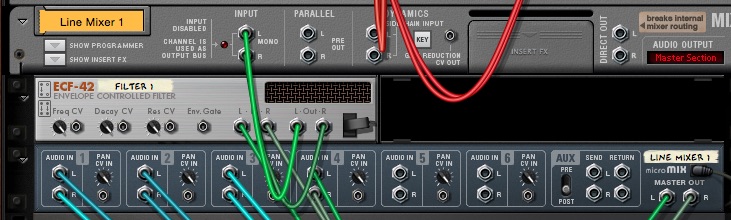
To do this create an ECF-42 device and connect its input to the output of the Mixer device, then the output of the ECF-42 to the Oberon Channel Mix input, like this:
Then, connect the separate output 2 gate signal (the socket is just above the audio stereo pair) to the ECF-42 “Env. Gate” input socket. The filter should trigger every four notes played.
Here we’ve configured our ECF-42 with very dynamic settings and a slow attack:And this what our loop sounds like in “Cycle” mode, followed by the same loop in “Vel.” mode:
An interesting feature of the Oberon Synthesizer is the ability to morph between two spectrums. With this you can create interesting crossfades between two different sounds, for example between an inharmonic one and an harmonic one. Sometimes the result is somewhat unpredictable but it is a definitely a place for experimentation. Lets take a closer look.
X-Morph
As said in the introduction, Oberon’s cross morph feature works with spectrums. It is not trying to morph between waveforms but between the corresponding “instantaneous” spectrums of oscillator 1 or oscillator 2. Before going into too much explanations, lets dive in and listen to what this does.
Start by creating an Oberon device then reset it to a default configuration. With no surprise you should hear a classic sawtooth when playing it. Now play around with oscillator 1’s x-morph knob. Hopefuly, you should very quickly come to the conclusion that nothing changes. How frustrating.
This is of course is very logical. Oscillator 1’s x-morph function lets you morph between its output spectrum and the output spectrum of oscillator 2. This works even if oscillator 2 is disabled, by the way. When Oberon is reset to its default configuration, the output spectrum of both oscillators are totally identical. They both use the same wave, with the same wave sequence position, are pitched identically and have their bend and partial clip modifiers muted (for more information on these two, check out the dedicated tutorial).
To hear something, we need to make oscillator 2 different. Lets change its wave by putting the wave position of oscillator 2 to 50%, which by default should be a triangle wave. Now, play while increasing oscillator 1’s x-morph knob:
As expected, the sound gradually fades to a triangle wave. Things aren’t quite exciting yet as this could already be done with the Waves 1 & 2, although with not exactly the same result. Now lets use a “metal” wave on oscillator 2 and play again while increasing the morph position:
As you can hear, the sound changes to metal smoothly and in a way that is different from a simple crossfade.
Metal Attack
With that in mind, lets create a patch that has a metallic attack and then fades to a triangle wave. For a reason that will become clearer near the end of the tutorial (and is purely related to the final patch we have in mind), lets use the metallic wave on oscillator 1 and the triangle wave on oscillator 2. Again, the triangle wave is by default in Wave 1 with start position set to 50%.
If you set oscillator 1’s x-morph position to 100%, played on a C2, you should hear this:
There is a strange beating / oscillation going on in the low end. We will come to that later on but that will be our end sound.
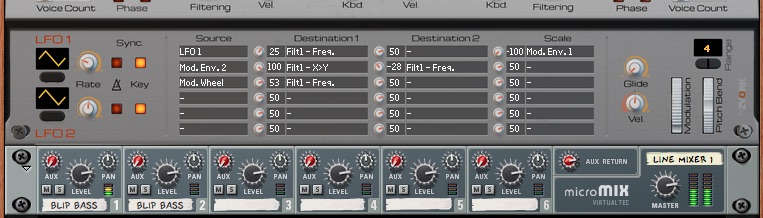
As we want the attack to be the metal sound, we need to use an envelope to modulation the x-morph position. We can use any three of them but as the first two are hard-cabled to the respective filters, lets use modulation envelope 3 for that. The default shape for this envelope is an instant attack decreasing curve, which is perfect for what we want.
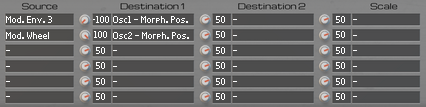
Configure the modulation matrix by setting on the first line the source to “Mod. Env. 3”, the destination to “Osc1 – Morph. Pos.” and the strength to -100. The default value of the morph position is set to 100% through the knob and we want it to be 0% on the attack, hence the -100 strength. If you are not familiar with the modulation matrix, we invite to read the documentation on Thor as Oberon’s modulation matrix is very similar. This is what the matrix should look like, once properly set:
Lets play the resulting patch:
I’m not quite satisfied with this. First of all the attack is a bit slow and second, the sustain sound is not quite what we had without the envelope modulation. But that’s just a few clicks away to resolve. We need to shorten our envelope and lower the sustain level to something that is similar to this:
Adding a layer
Lets move on by adding a new layer to our sound. This time we will take a look at oscillator 2 so lower oscillator 1’s level to 0, push up oscillator 2’s level to 0 dB and active oscillator 2. For the moment we have a flat triangle tone:
By default, oscillator 2’s morph feature takes oscillator 1 as a target spectrum. If we keep it that way we will morph towards the metal wave which is already what we are doing with the other oscillator. Instead, lets morph oscillator 2 to… oscillator 2! It sounds completely useless as is but is more interesting if we decide to morph oscillator 2’s spectrum to that same spectrum but transposed. Again, lets first listen to what this does.
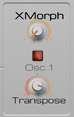
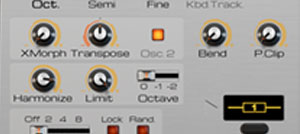
Configure oscillator 2’s x-morph section like the image below by clicking on disabling the “Osc. 1” button and turning the transpose knob to the left to the +19 semitones value.
Now play the patch while increasing the morph position:
The first thing we notice is that morphing between a transposed version of the same oscillator isn’t just a simple pitch bend. Some interesting low frequency growling appear that we could take advantage of. The other thing we can notice is that even with morphing at 100%, the resulting sound isn’t completely a triangle wave transposed higher. Well, now’s the time for an explanation.
Morph curve
By default, Oberon’s morph feature operates on the medium and high pitch partials of the spectrum, leaving the low pitch intact. This is to try to preserve the note pitch of the sound. So even at 100%, some parts of the spectrum correspond to the source spectrum while the rest are part of the destination spectrum. In between, some partials can be pitched half-way, yielding some inharmonicity. This is what we heard in our previous attempts.
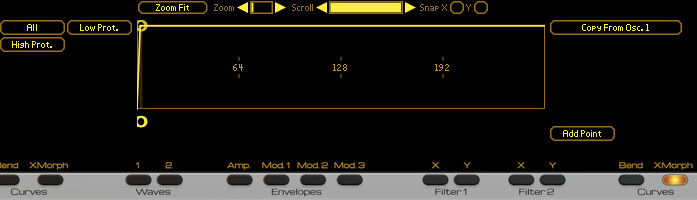
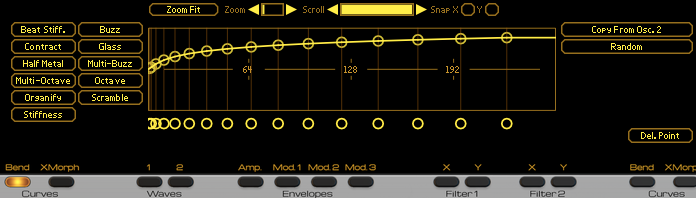
Thankfully, we can override this behavior easily as all this is done, again, through a curve. Click on the right side “XMorph” button of the display buttons “Curves” section. This controls the x-morph intensity for each part of the spectrum. Your central display should now look like this:
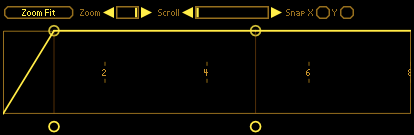
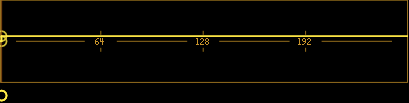
High level values of the curve indicate that x-morph should occur at full value at that position. As you can see, there are a few curve templates mainly for protecting the low end of the spectrum (which is basically the default) or on the contrary, the high end. The one that we are interested in is the “All” preset which sets morphing intensity to full value everywhere on the spectrum. Click on the “All” preset button and move the “Zoom” scrollbar fully to the right to have this display:
The numbers displayed (2, 4, 6, 8, …) indicate the harmonic rank positions. As you can see the curve rises directly to full value at where we can assume is the rank 1 (which corresponds to the note pitch, if you are now familiar with additive synthesis) position.
With that new curve, lets play our patch, again with an increasing morph position:
This time we can clearly hear a square wave, just an octave lower, when the morph position is at 100%
Finishing Touches
Now that we’ve hear what x-morphing to the same oscillator does, lets use this to our advantage and link that effect to the modulation wheel. Set oscillator 2’s x-morph position knob to 0%, set the source on the modulation matrix’s second line to “Mod. Wheel”, the destination to “Osc2 – Morph. Pos.” and this time intensity to 100%.
Turn back on oscillator 2 by pushing the corresponding level fader to 0 dB and slightly detune both oscillators a handful of cents (for instance -5 on oscillator 1 and +5 on oscillator 2). Now play a little tune while playing with the modulation wheel. You can even use some harmonize (like we did, at 75, with the harmonize octave set to -1) if you find it really too inharmonic:
Finally, to give it more character, lets apply a “Bell” template to our amplitude envelope curve and crank down the filter 1 frequency to around 600 Hz. Now we’ve go an interesting little metal pluck with a sort of larsen control on the modulation wheel:
8x Unison and Octave virtual voices per oscillator.
After discovering in the last tutorial the more complex features of Oberon, today things will be lighter… and fatter. Yes, in todays modern music, we like it when sounds get fat, thick and deep. With its two oscillators, Oberon can already give you a certain amount of that by layering these two oscillators together.
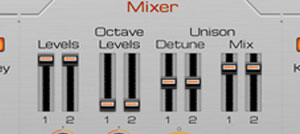
Mixer
At the center of Oberon lies the mixer which lets you control various levels of the synthesizer, including, most of all, the output levels of both oscillators controlled by the two left-most faders. By default, and in our current bell patch, you should notice that fader 1 is at full value and fader 2 at its lowest. Sure enough, only oscillator 1 can be heard. Push up fader 2 to the maximum value and press a key.
Nothing has changed, right? By default, oscillator 2 is disabled for performance reasons. It’s very easy to correct that as we just have to click on the enable button at the left of the “Oscillator 2” section label. Now play again. This is what should come out of your speakers on a C2 note:
You can listen only to oscillator 2 by lowering oscillator 1’s output level to the minimum. We recognize a saw wave with a modulated low pass filter. That’s perfectly logical as we can see that oscillator 2 is using Wave 1 (which is a saw wave by default), with the start at 0%. The oscillator is also routing its output to both filters in serial, hence the modulated low pass sound.
That saw wave on top of our bell sound isn’t really the character we want. Lets switch oscillator 2 to a softer and leaner triangle wave sound by turning oscillator 2’s start knob to 50%. We gain a stronger harmonic feel while keeping the bell characteristic:
We can furthermore tune oscillator 2 differently from the first one for a different sound. Here we’ve tuned it an octave higher by setting the Octave knob to +1 and slightly detuned it with a Fine knob at -7:
Layering oscillators is an effective way to enrich our sound. Unfortunately, it can sometimes be cumbersome to reconfigure entirely a second oscillator when you only want a slightly detuned copy of the first one.
Octave
Thankfully, Oberon can generate an exact copy of each oscillator but an octave higher. This is great for fat bass sounds or rich string sections. By the way, that copy is not done through a third or fourth oscillator so it is extremely efficient on your CPU.
In the mixer section, the two faders labelled “Octave Levels” control the levels of these two “octave copy” virtual oscillators. Push up oscillator 2’s octave level to the max:
The sound is brighter that’s for sure but we’re not quite convinced by the result. Let’s mute oscillator 2’s octave copy and turn up oscillator 1’s octave copy:
That’s more bell-like and there is also an unexpected chorus-like effect, too. Lets keep this.
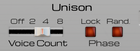
Unison
In the same manner that Oberon can generate lightweight octave copies of each oscillators, it can also create multiple slightly detuned (in the order of cents) copies of them. To do this, we first need to set the number of these virtual copies in the oscillator’s Unison section at the bottom. Lets start with 4. Instantly our bell sound becomes lush and dreamy:
Phase control
You may notice when listening carefully that the attack of our bell sometimes becomes softer or slower. This seems to be somewhat random. This is due to the difference in phase between each virtual copy and the original oscillator sound. When a new note is pressed, that start phase is different for each copy. When all copies and oscillator are nearly “in phase” we have a nice attack but when they are “out of phase”, the attack becomes softer because some virtual oscillators start out by canceling each other out. This is not really problematic for slow attack sounds but for us, it’s not quite satisfying.
Lock
Thankfully, we can counter that by enabling the Lock button of the unison phase section. That will ensure that at each note press, each oscillator is set to the same start phase. All copies are “in phase” with the oscillator. This will give us a very powerful attack and we might have to control that by lowering the gain. Lets hear what this does on our bell:
Sure enough, the attack of our bell is now strong and clear.
Random
If you feel that attack is too strong, we can enable the “Random” feature on the unison phase. This has the effect of randomizing the phase for each unison partial. With lock enabled, we will have random start phases for each unison partials but these phases will remain the same for each key pressed, which is exactly what we want. Lets listen to the result:
That sounds perfect: a nice lush consistent sound.
By the way, modifying the phase for each unison partial results in change in timbre, especially on harmonic sounds and can also be used for that effect.
Tuning and Mix
An important parameter for unison is the amount of detuning applied to these virtual copies. Low values will give slow phasing effects while high values will yield the famous “hoover sound”. Controlling that detune value is done in the mixer section with the Unison Detune faders. Lets first try changing the detune value of oscillator 1’s unison to a very low value of 4:
The sound is definitely thinner. Now lets try with a detune set to 75:
Very, very lush but it sounds almost out of tune. We can revert back to a lower detune value but lets try an alternate route by playing around with the Unison Mix.
The mix value controls the dry / wet mix between the direct oscillator output and the virtual unison copies. Lets lower that to 40%:
That’s certainly better as the “out of tune” feel is really under control now but will still retain that very high lushness to our sound.
To finish off this tutorial, lets crank up all these virtual copies to the maximum by putting oscillator 2’s octave level to the max and enabling an 8 voice unison on that same oscillator. How’s that for a nice lush bell sound?
Manipulate oscillator spectrums with bend, harmonize and clip.
In the previous tutorials we have manipulated Oberon in ways very similar to classic subtractive synthesis. For this third tutorial we will start using some features more specific to additive synthesis: bend, harmonize and partial clipping. All these features modify the spectrum of the sound at a partial level. But then again, under the hood, in additive synthesis, everything comes down to modifying the partials.
First of all, let’s start with a clean sheet by creating an Oberon instance and reseting it. Set the wave start of Oscillator 1 to 50% so as to use the second shape of Wave 1. You should hear a classic unfiltered triangle wave sound.
Partial Clipping
The first partial modifier we will explore is located at the bottom left of the Oscillator 1 section and is labelled “P.Clip”. To better understand what is happening, you can open the spectrum EQ window on the Oberon rack or just rely on your ears. Let’s first play a note while cranking up the P.Clip knob:
As you can hear, the sound gets brighter and harsher with increased partial clipping. If we put back the wave start to 0% to play a saw wave (the default Wave 1 shape 1, remember), the effect is even more noticeable and the sound is almost nasal:
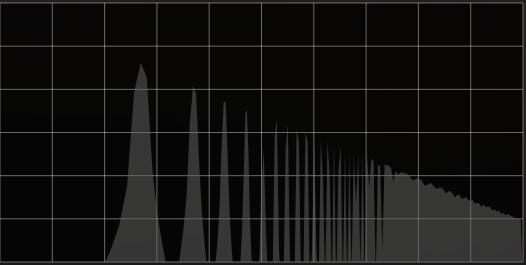
Looking back our spectrum EQ window, here are the two saw spectrums, one without partial clipping and the other with a full effect:
No ClippingWith Clipping
As you can maybe deduce, partial clipping has the effect of soft clipping the partial levels. In other words, it will boost low level sections of the spectrum while slightly lowering or at least maintaining high level sections. But then again, if we don’t want to delve into that much detail, we can also just see this as a “brighter” or “harsher” knob!
Let’s set back the wave start to 50% to have a triangle wave and put the partial clipping to around 75%. This will be our base timbre for the tutorial and it should sound like this on a C2 note:
Bend
For the moment we have just played around with spectrum levels but another nice aspect of additive synthesis is that we can also change the pitch of parts of the spectrum. Remember, additive synthesis lets us control individual portions of the spectrum through partials. This is done with Oberon with the Bend feature.
Again, prior to any explanation, lets just hear what this does:
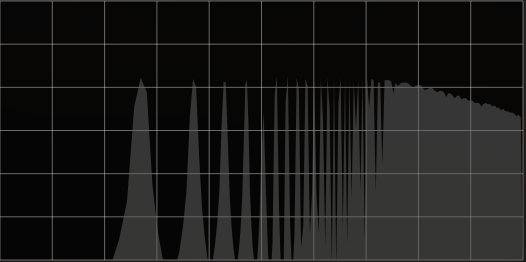
It kind of sounds as if we were upwards pitch bending our sound but not quite as the timbre also changes to become metallic or bell like. Again, if we take a look at our spectrum window before and after bending, something pops up:
No BendingWith Bending
The peaks identifying the harmonics of the sound seem to have been displaced to the right of the spectrum, that is, to the higher frequencies. The effect seems also more pronounced as we go up in frequency. Let’s play a small melody, without and then with 50% bending:
As we can hear, the pitch or notes remain the same. It is just the timbre that changes to become really more metallic or glass like. That is pretty normal as the sound becomes less and less harmonic as the partial pitches are displaced from the harmonic frequencies, which is exactly what happens in bells, metal rods or very rigid strings: the frequencies produced are not harmonic. If you increase your guitar string tensions to an insane amount, apart from pitching the note up, you will also notice this effect.
If you don’t want to go into much detail, you can just stop there and consider the bend modifier to be analog to a “string tension”, “metallize” or “glassify” effect. If you are more curious and power hungry, let’s dive.
Bend curve
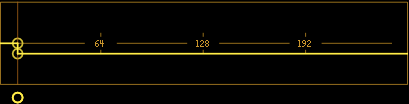
You may have noticed in the series of display buttons, next to the envelopes and waves, two buttons labeled “Bend”. It’s time we take a look so lets press the one on the left, associated with Oscillator 1. The top display changes to this:
Again, this should look familiar now that we’ve manipulated the envelopes and wave display but a big question arises: what does that curve manipulate? First of all, let’s play around with the different curve templates on the left.
To hear the full effect put back the oscillator 1 bend to 100%. Then let’s select “Buzz” and play:
A low frequency buzzing or beating can be heard, depending on the note played.
Now select template “Octave” and play around again:
This time the sound is harmonic but it has lost its characteristic “triangle / square” sound to become closer to saw timbre. Intriguing…
Finally, select template “Stiffness” and play:
That sounds like the original bend effect we started with and, as the name suggests, could correspond to an increasing string stiffness / tension.
Now, what exactly is going on here? Bending has the effect of increasing or diminishing the frequency spacing between partials in your oscillator’s spectrum. Said differently, it has the effect of contracting or stretching the frequencies of parts of your spectrum. With it you can mimic physical behaviors, like increased string tension, or completely crazy unpredictable stuff.
Curve points above the middle line will increase the frequency spacing and points underneath will contract it. The left start point of the curve is always the fundamental frequency of your note and that cannot be bent so as to keep your overall pitch intact. As we go towards the right side, the curve impacts higher harmonics.
With all this, we can understand the bend curves better. Lets start with the first “Buzz” curve. The lower harmonics are unchanged but higher harmonics are contracted, giving the illusion of a low frequency sound, hence the buzz or beating we hear.
With the “Octave” curve, we have the inverse effect. All harmonics except the fundamental have their pitch scaled up. We can’t really see it in the display but, believe me, they are scaled up by one octave. This is why the effect retains the harmonic character of the original sound. To position your bend curve points on octaves (either up or down), simply enable the “Snap Y” checkbox at the upper right of the curve display. This will have the effect of snapping your points vertically to octave positions.
Finally, with the “Stiffness” curve, we can see that, as we deduced from looking at the spectrum EQ window, as we go higher up the spectrum, the partial pitches are more and more stretched upwards. This, again, replicates the harmonic distortion of a very stiff string.
Ok, enough theory and curve manipulation.
Creating a bell sound
With this bending feature, it is extremely easy to create bell sounds. Just crank up the bend and add some filtering. Thankfully, there is a “Bell” envelope preset we can use both for the amplitude and modulation 1 envelopes. Here’s our try on a bell patch with bend set to 100% with the default “Stiffness” curve, the filter 1 frequency set to 700Hz and both amplitude and modulation 1 envelopes set to “Bell”. We’ve just moved the amplitude envelope’s sustain point to around 3 seconds for a longer decay. Listen to this:
I don’t know what you think of this but, although it may sound realistic, there is a slight off-tune character to the patch that I don’t really like. Let’s see how we can fix this.
Harmonize
That slightly off-tune characteristic of our patch is due to its inharmonic nature. We could counter balance this by reducing the bend but that might alter our timbre too much. Thankfully, we have a second option with the Harmonize knob.
Harmonize is a very simple but effective mean of forcing your oscillator back to musical territory. It gently pitches back all your partials to the nearest harmonic frequency. We can hear this by increasing the harmonize strength as we play:
There is a slight change of timbre but much less pronounced than with altering the bend. If you are still not satisfied, we have another trick up our sleeves. By default, the harmonize feature forces back the partials to harmonic frequencies of the current note. We can instead ask to use the harmonic frequencies of the same note but one or even two octaves below. This will keep our sound harmonic but with sub-octave harmonics. Since sub-octave harmonics are closer appart (the distance between two harmonics is exactly the note frequency, remember), our harmonized oscillator will have a higher chance of sounding like the original oscillator.
Let’s try this on our tune with harmonize set to the full value at the default “0” octave setting, then the “-1” value and finally the “-2” octave setting:
Still not satisfied?
Limit
We have another trick with the Limit setting of our harmonize feature. By default, the harmonize works on all parts of the spectrum. But with the limit knob we can decide to limit the effect to the low end thus keeping some inharmonic partials in the high frequencies while retaining the benefit of harmonize and keep a more distinct note pitch which is essentially determined by the lower harmonics.
To hear this, put the octave setting back to 0 and play with the limit by turning the knob to the left until you are satisfied. We want to keep a metallic aspect to our sound but we wish to keep it in tune. To our ears, putting the limit around 33 sounds just fine: