

An interesting feature of the Oberon Synthesizer is the ability to morph between two spectrums. With this you can create interesting crossfades between two different sounds, for example between an inharmonic one and an harmonic one. Sometimes the result is somewhat unpredictable but it is a definitely a place for experimentation. Lets take a closer look.
X-Morph
As said in the introduction, Oberon’s cross morph feature works with spectrums. It is not trying to morph between waveforms but between the corresponding “instantaneous” spectrums of oscillator 1 or oscillator 2. Before going into too much explanations, lets dive in and listen to what this does.
Start by creating an Oberon device then reset it to a default configuration. With no surprise you should hear a classic sawtooth when playing it. Now play around with oscillator 1’s x-morph knob. Hopefuly, you should very quickly come to the conclusion that nothing changes. How frustrating.
This is of course is very logical. Oscillator 1’s x-morph function lets you morph between its output spectrum and the output spectrum of oscillator 2. This works even if oscillator 2 is disabled, by the way. When Oberon is reset to its default configuration, the output spectrum of both oscillators are totally identical. They both use the same wave, with the same wave sequence position, are pitched identically and have their bend and partial clip modifiers muted (for more information on these two, check out the dedicated tutorial).
To hear something, we need to make oscillator 2 different. Lets change its wave by putting the wave position of oscillator 2 to 50%, which by default should be a triangle wave. Now, play while increasing oscillator 1’s x-morph knob:
As expected, the sound gradually fades to a triangle wave. Things aren’t quite exciting yet as this could already be done with the Waves 1 & 2, although with not exactly the same result. Now lets use a “metal” wave on oscillator 2 and play again while increasing the morph position:
As you can hear, the sound changes to metal smoothly and in a way that is different from a simple crossfade.
Metal Attack
With that in mind, lets create a patch that has a metallic attack and then fades to a triangle wave. For a reason that will become clearer near the end of the tutorial (and is purely related to the final patch we have in mind), lets use the metallic wave on oscillator 1 and the triangle wave on oscillator 2. Again, the triangle wave is by default in Wave 1 with start position set to 50%.
If you set oscillator 1’s x-morph position to 100%, played on a C2, you should hear this:
There is a strange beating / oscillation going on in the low end. We will come to that later on but that will be our end sound.
As we want the attack to be the metal sound, we need to use an envelope to modulation the x-morph position. We can use any three of them but as the first two are hard-cabled to the respective filters, lets use modulation envelope 3 for that. The default shape for this envelope is an instant attack decreasing curve, which is perfect for what we want.
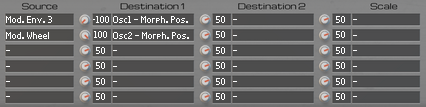
Configure the modulation matrix by setting on the first line the source to “Mod. Env. 3”, the destination to “Osc1 – Morph. Pos.” and the strength to -100. The default value of the morph position is set to 100% through the knob and we want it to be 0% on the attack, hence the -100 strength. If you are not familiar with the modulation matrix, we invite to read the documentation on Thor as Oberon’s modulation matrix is very similar. This is what the matrix should look like, once properly set:

Lets play the resulting patch:
I’m not quite satisfied with this. First of all the attack is a bit slow and second, the sustain sound is not quite what we had without the envelope modulation. But that’s just a few clicks away to resolve. We need to shorten our envelope and lower the sustain level to something that is similar to this:

Adding a layer
Lets move on by adding a new layer to our sound. This time we will take a look at oscillator 2 so lower oscillator 1’s level to 0, push up oscillator 2’s level to 0 dB and active oscillator 2. For the moment we have a flat triangle tone:
By default, oscillator 2’s morph feature takes oscillator 1 as a target spectrum. If we keep it that way we will morph towards the metal wave which is already what we are doing with the other oscillator. Instead, lets morph oscillator 2 to… oscillator 2! It sounds completely useless as is but is more interesting if we decide to morph oscillator 2’s spectrum to that same spectrum but transposed. Again, lets first listen to what this does.
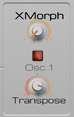
Configure oscillator 2’s x-morph section like the image below by clicking on disabling the “Osc. 1” button and turning the transpose knob to the left to the +19 semitones value.
 Now play the patch while increasing the morph position:
The first thing we notice is that morphing between a transposed version of the same oscillator isn’t just a simple pitch bend. Some interesting low frequency growling appear that we could take advantage of. The other thing we can notice is that even with morphing at 100%, the resulting sound isn’t completely a triangle wave transposed higher. Well, now’s the time for an explanation.
Morph curve
By default, Oberon’s morph feature operates on the medium and high pitch partials of the spectrum, leaving the low pitch intact. This is to try to preserve the note pitch of the sound. So even at 100%, some parts of the spectrum correspond to the source spectrum while the rest are part of the destination spectrum. In between, some partials can be pitched half-way, yielding some inharmonicity. This is what we heard in our previous attempts.
Thankfully, we can override this behavior easily as all this is done, again, through a curve. Click on the right side “XMorph” button of the display buttons “Curves” section. This controls the x-morph intensity for each part of the spectrum. Your central display should now look like this:
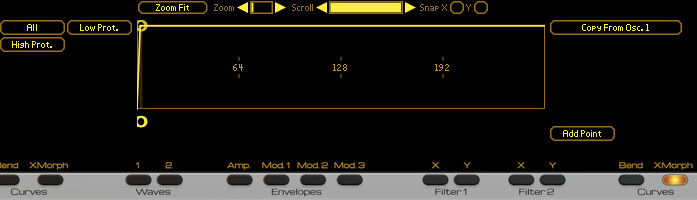 High level values of the curve indicate that x-morph should occur at full value at that position. As you can see, there are a few curve templates mainly for protecting the low end of the spectrum (which is basically the default) or on the contrary, the high end. The one that we are interested in is the “All” preset which sets morphing intensity to full value everywhere on the spectrum. Click on the “All” preset button and move the “Zoom” scrollbar fully to the right to have this display:
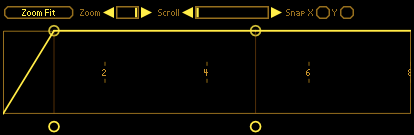
The numbers displayed (2, 4, 6, 8, …) indicate the harmonic rank positions. As you can see the curve rises directly to full value at where we can assume is the rank 1 (which corresponds to the note pitch, if you are now familiar with additive synthesis) position.
With that new curve, lets play our patch, again with an increasing morph position:
This time we can clearly hear a square wave, just an octave lower, when the morph position is at 100%
Finishing Touches
Now that we’ve hear what x-morphing to the same oscillator does, lets use this to our advantage and link that effect to the modulation wheel. Set oscillator 2’s x-morph position knob to 0%, set the source on the modulation matrix’s second line to “Mod. Wheel”, the destination to “Osc2 – Morph. Pos.” and this time intensity to 100%.
Turn back on oscillator 2 by pushing the corresponding level fader to 0 dB and slightly detune both oscillators a handful of cents (for instance -5 on oscillator 1 and +5 on oscillator 2). Now play a little tune while playing with the modulation wheel. You can even use some harmonize (like we did, at 75, with the harmonize octave set to -1) if you find it really too inharmonic:
Finally, to give it more character, lets apply a “Bell” template to our amplitude envelope curve and crank down the filter 1 frequency to around 600 Hz. Now we’ve go an interesting little metal pluck with a sort of larsen control on the modulation wheel: