
Creating a patch with the Oberon Synthesizer always starts with the oscillator section. This is where the raw sound is produced. If you are a bit familiar with basic synthesizer architectures like the ones found in the Reason stock devices Subtractor or Thor, you should feel confortable with Oberon’s oscillator section, at least for the basic settings. If not, we invite you to read a first brief Introduction to subtractive synthesis which is the heart of these architectures.
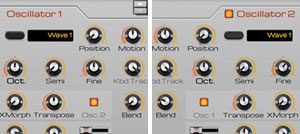
First of all, lets start with a clean sheet by creating an instance of Oberon and reseting the device (right click on the device and choose “Reset Device”). For this tutorial, we will only use the first oscillator, which is the only one active by default. So no need to change anything for the moment.
Basic Settings
Tuning
Lets first get rid of the obvious and very basic settings, the pitch. By default, the pitch of a sound is determined by the note of the key you press. For instance, the C4 key generates a sound at a corresponding C4 pitch, which generally corresponds to frequency around 261-262 Hz. We can transpose this by octaves using the Octave knob, lowering the pitch for negative octave values and vice versa with positive values between -4 and +4. Likewise, the Semi knob transposes the pitch by semitone increments, between +0 and +11. Finally, the Fine setting lets you do micro adjustments to the pitch by 1/100th of semitones. This is great when both of Oberon’s oscillators are activated, each one slightly detuned for that very classic fat lush sound. But lets stick to one oscillator for the moment.
You can keep the pitch to the default setting for the time being. If you press the C2 key you should hear a beautiful rich sawtooth wave that sounds like this:
Stereo
If you have a stereo speaker setup or, even better, headphones you should hear the above sound as a mono fully  centered sound. Both oscillators in Oberon have a separate Pan and Width knob to control the placement and width in stereo space. Oscillator 1 settings are the left knobs.
While the pan setting is fairly obvious, the width needs some extra explanation. Due to the nature of its audio engine, Oberon can spread the spectrum of its oscillators across the stereo field making each oscillator true stereo oscillators. This may alter the timbre slightly as parts of the spectrum will be completely to one side leaving “holes” in the spectrum on the other side. Hopefully, when the width is to the maximum, you should feel the stereo field is pretty well balanced.
Press the C2 key while progressively increasing the width of oscillator 1 and you should hear something like this (headphones or stereo speakers required, of course):
Ok, lets keep the width to a low level just to have a slight width by setting it between 15 and 17.
Controlling Timbre
Wave types
Sawteeth are great but, thankfully, the Oberon oscillators can generate much more. Right at the top of the  oscillator section is a display with the name of the current wave, here “Wave 1”, which corresponds to a sawtooth. The type of the wave defines the timbre of the oscillator.
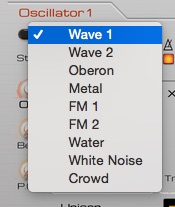
If you press the button to the left of oscillator 1’s wave type display, a popup menu appears with the list of all available waves. As we will see later on, waves 1 & 2 are a bit special. You can change the wave types and listen to the different timbres they produce. Some of them sound frankly out of tune and not very musical, especially the Metal, Water, White Noise and Crowd ones. These waves are “inharmonic” or not harmonic.
Choose the Oberon wave. It should sound like this on a C2:
It is not the sexiest sound in the world.
Wave sequences
In classic subtractive synthesizers, a wave is defined by its shape in time. By repeatedly playing that shape, the synthesizer creates a periodic musical sound with a defined pitch. The shape defines the timbre and the duration of the shape defines its pitch. By changing that shape over time, instead of repeating it but by keeping the same shape duration, a synthesizer can generated a sound of evolving timbre but of constant pitch. A wave table or wave sequence, is a sequence of shapes that defines what shape the oscillator should generate depending on a position in that sequence. That position can be static, in which case the oscillator produces repeatedly the same shape, or in movement backwards or forward, at different speed levels.
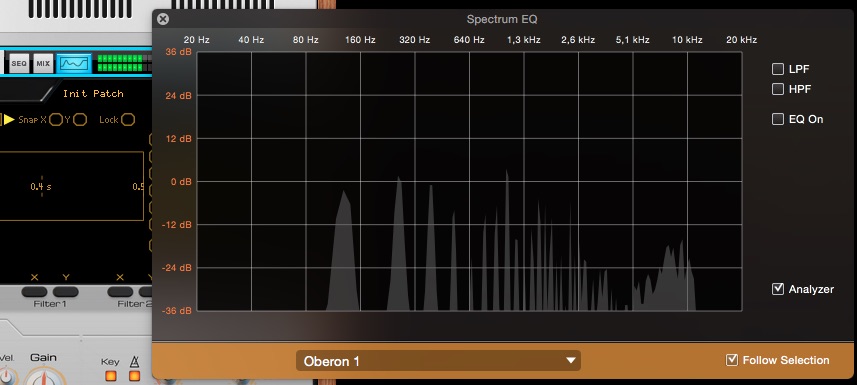
In Oberon, things are slightly different due to its more generic additive engine. To each wave shape corresponds a corresponding sound spectrum. The two are completely analog and are two different ways of identifying a timbre either by looking at it in the time domain or in the spectral / frequency domain. This is even more obvious and is a nice way of working with Oberon when sound designing when you display the spectrum EQ window of Reason.
If you press, again, the C2 key on your keyboard you should have something like this displayed in your spectrum window:
 You can notice, if you keep the key down, that the spectrum is static and doesn’t change over time.
Oberon waves are in fact wave sequences. By default, the first “wave form” is used. “Wave form” isn’t an appropriate term in Oberon as it suggests, as in classic subtractive synthesis, that they are defined shapes that are played repeatedly. In Oberon, wave sequences are really spectrum sequences. Each entry in the sequence is a different spectrum. That may seem like not much of a difference but in fact it makes a huge difference because a spectrum may not necessarily correspond to a periodic musical sound. If you listen to the Metal or White Noise waves, for instance or even better, record them and have a look at their shape, you will notice that they do not sound musical, don’t have a really defined pitch and absolutely don’t have a periodic wave shape!
By working with spectrum sequences, Oberon can create timbres that evolve from periodic musical tones to completely metallic inharmonic ones, which is totally impossible to do with classic synthesis.
Wave Start
The Start knob in the oscillator section defines the position in the sequence that the oscillator should use to look-up the spectrum for the timbre. Each wave type has a different number of spectrums in their sequence but all sequences loop back to the first spectrum when start is set to 100%: the spectrum at 0% is the same as 100%.
With the wave type set to Oberon, if you press the C2 key and play around with the start knob, you should hear something like this:
Notice how the display in the spectrum EQ window changes with each change of the start parameter.
Wave motion
While moving the start knob manually can give fun results, half of the time, we would like the sequence to play automatically. The Motion knob controls the speed of the sequence play back. When you press a key, the first spectrum played is the one indexed by the start position. Afterwards, Oberon automatically increases the position based on the motion parameter until you release the key. Of course, by default, each note has an independent sequence position but that can be changed by disabling the key sync button.
This motion can be set to move forward in the sequence, or backwards but the sequence position will always loop. The motion speed is by default synced to the song tempo but again, this can be changed.
Lets play our Oberon wave with a bit of forward motion. Set the start to 0% and the motion to 1/1 by turning the motion knob about half-way to the right. A motion at 1/1 indicates that the wave sequence will be looped every bar. Press our faithful C2 key and you should here an emotionally devoid robot repeatedly saying “Thisss izzzzz Oberrrr-t-on”. Or something fairly close.
If you press different keys on your keyboard you should notice that the speed of the phrase remains the same while being pitched accordingly.
Editable waves
When we first presented the wave types, we stated that Waves 1 & 2 were special. But in what way? Well, they are editable. Waves 1 & 2 are very simple wave sequences made each of two wave forms / spectrums. Since, again, every wave in Oberon loops back on its start spectrum, if you choose Wave 1 or 2 as a wave type, the first wave form of the sequence is played when the start is at 0% or 100% and the second wave form is used when the start is at 50%.
To get a look at the default wave forms used for Wave 1, for instance, just click on the button labeled “1” of the two “Waves” buttons. Pressing these buttons changes the big central display of Oberon to the current wave, where, by default, it displays the amplitude envelope. If you want to go back to the amplitude envelope, just click on the “Amp” button of the “Envelopes” buttons. If you pressed the Wave 1 display button here is what you should see:
As you can recognize, this is a descending sawtooth. To the left of the central display are a series of wave shape templates. Clicking on them will apply the templates to the curve. Try clicking on CZ for instance and you should see this shape:
To hear what this sounds like, choose the Wave 1 wave type on oscillator 1, set the start knob to 0% and don’t forget to put back the motion knob back to “Off”. Hopefully, on our classic C2, this is what you should hear:
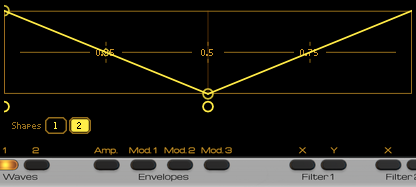
To display the second shape of the Wave 1 sequence, we must click on the “2” shapes button just at the lower left of the curve display. This is what you should see, a beautiful triangle wave:
 Put back some motion in there by setting the motion parameter to 1/4 and we should here a rich pulsating timbre that pulses every quarter note:
Now, for the fun part. Lets modify the second shape of Wave 1. Click and drag the existing shape curve buttons and use the “Add Point” / “Delete Point” features to create a shape that ressembles this:
To listen to this wave shape, we must set the start to 50% and turn off motion:
Put back some motion, for instance at 2/1, and we have a nice bright growling bass when played on low notes:
You can now play around with all this and then join us for the next tutorial.


